
Tasty Air Fryer Cheesy Pepperoni Pizza Rolls Recipe for Snack Time
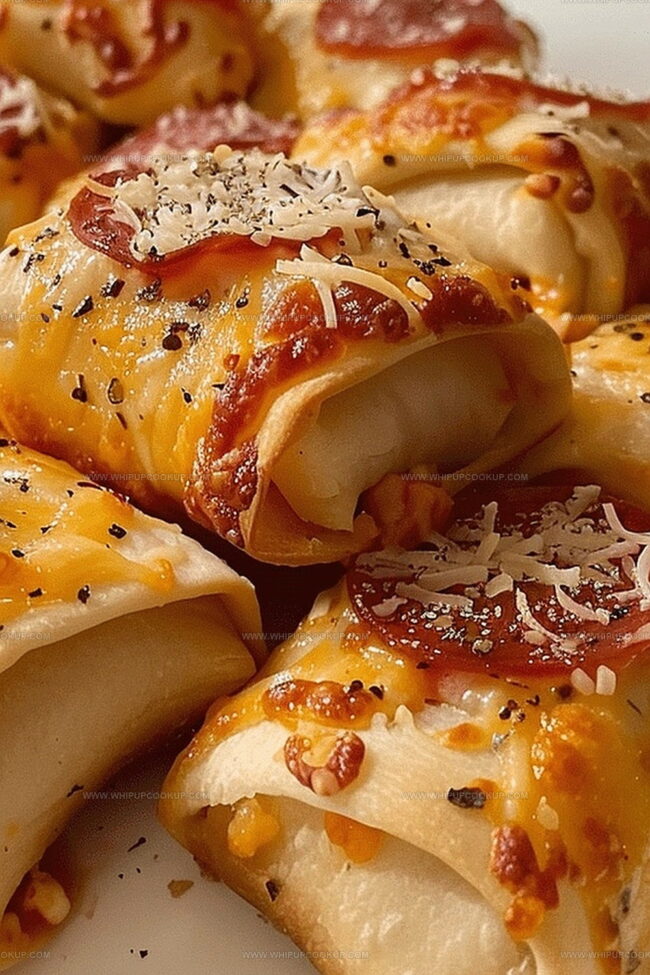
Crispy and golden air fryer cheesy pepperoni pizza rolls promise a delightful twist on classic comfort food.
Bubbling mozzarella melts perfectly inside these bite-sized treats.
Homemade versions beat store-bought options every single time.
Packed with zesty pepperoni and gooey cheese, these rolls deliver maximum flavor in minimal time.
Quick preparation means you can satisfy your pizza craving in just minutes.
Minimal cleanup and maximum enjoyment make this recipe a total winner.
Dive into these irresistible pizza rolls and experience pure snacking bliss.
What Makes Air Fryer Cheesy Pepperoni Pizza Rolls So Handy
Cheesy Pepperoni Pizza Rolls (Air Fryer) Ingredients
Main Ingredients:Sauce and Seasonings:Finishing Ingredients:Air Fryer Pizza Rolls Preparation

Step 1: Prepare Pizza Dough Surface
Spread out your pizza dough and slice it into neat little squares measuring approximately 3 by 3 inches, creating perfect bite-sized canvases for your delicious pizza rolls.
Step 2: Spread Savory Sauce
Generously paint each dough square with a thin, delectable layer of rich pizza sauce, ensuring every corner gets a tasty coating.
Step 3: Layer Delicious Toppings
Sprinkle your squares with a generous helping of yummy ingredients:Step 4: Create Pizza Roll Bundles
Carefully roll each square into a compact bundle, gently pinching the edges to create a secure seal that keeps all the cheesy goodness inside.
Step 5: Add Flavor-Boosting Touches
Lovingly brush the tops of your rolls with melted butter, then dust with:Step 6: Position Rolls in Air Fryer
Carefully place the rolls seam-side down in the air fryer basket, ensuring they’re not overcrowded.
Step 7: Crisp and Cook
Air fry the rolls at 375°F for 6-8 minutes, watching them transform into golden, crispy delights with a beautiful, appetizing color.
Step 8: Serve and Enjoy
Allow the rolls to cool for a few moments, then serve warm alongside marinara sauce for dipping. Get ready for a mouthwatering experience!
Pizza Roll Tips That Keep Air Fryer Snacks Cheesy and Crisp
Tips for Keeping Air Fryer Pizza Rolls Fresh
Snack Matches for Pizza Rolls
Pair Perfectly Pizza Rolls with Zesty Companions:Pizza Roll Flavor Combos
FAQs
Yes, homemade pizza dough works perfectly. Just ensure it’s rolled out thin and at room temperature for best results.
Lightly spray the air fryer basket with non-stick cooking spray before placing the rolls to ensure easy removal and prevent sticking.
Absolutely! Kids love these cheesy, pepperoni-filled rolls. They’re easy to eat and make a fun party snack or quick meal.
You can prepare the rolls in advance and refrigerate them. Just add 1-2 minutes to the cooking time when air frying directly from the refrigerator.
Print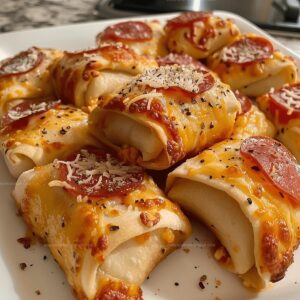
Air Fryer Cheesy Pepperoni Pizza Rolls Recipe
- Total Time: 23 minutes
- Yield: 8 1x
Description
Pepperoni pizza rolls sizzle with cheesy goodness straight from the air fryer, delivering crispy comfort in every bite. Quick and easy preparation makes these rolls perfect for snack time or game day gatherings you’ll absolutely love.
Ingredients
Main Ingredients:
- 1 can refrigerated pizza dough
- 1 cup shredded mozzarella cheese
- 1/2 cup mini pepperoni (or chopped regular pepperoni)
- 1/2 cup pizza sauce
Seasonings:
- 1/2 teaspoon garlic powder
- 1/2 teaspoon Italian seasoning
Finishing Ingredients:
- 1 tablespoon melted butter
- Marinara sauce (for dipping)
Instructions
- Unfurl the pizza dough onto a clean surface and transform it into precise, uniform squares measuring approximately 3×3 inches.
- Delicately paint each square with a gossamer layer of zesty pizza sauce, ensuring complete coverage without oversaturating.
- Lavishly distribute generous pinches of shredded mozzarella across the sauced surface, creating a molten cheese foundation.
- Strategically nestle miniature pepperoni slices atop the cheese, arranging them for maximum flavor distribution.
- Carefully roll each square into compact cylinders, meticulously sealing the edges by pinching and pressing to prevent ingredient leakage.
- Infuse the exterior with a luxurious brushing of melted butter, then sprinkle a harmonious blend of garlic powder and Italian seasoning for aromatic enhancement.
- Position the rolled parcels seam-side downward within the air fryer basket, ensuring slight separation between each roll for optimal circulation.
- Activate the air fryer and program to 375°F, allowing the rolls to transform into golden, crisp delicacies over 6-8 minutes.
- Extract the sizzling rolls and permit brief cooling to prevent potential mouth burns, then serve alongside a ramekin of warm marinara for dipping pleasure.
Notes
- Use room temperature ingredients to ensure even cooking and better flavor melding.
- Seal pizza rolls tightly to prevent cheese from leaking during air frying.
- Experiment with different fillings like ricotta, spinach, or alternative meats for variety.
- For a gluten-free version, swap traditional pizza dough with cauliflower or gluten-free pizza crust.
- Prep Time: 15 minutes
- Cook Time: 8 minutes
- Category: Snacks, Appetizer, Lunch
- Method: Air Frying
- Cuisine: Italian
Nutrition
- Serving Size: 8
- Calories: 200
- Sugar: 2 g
- Sodium: 450 mg
- Fat: 10 g
- Saturated Fat: 4 g
- Unsaturated Fat: 6 g
- Trans Fat: 0 g
- Carbohydrates: 24 g
- Fiber: 1 g
- Protein: 8 g
- Cholesterol: 20 mg
Marcus Hale
Founder & Recipe Storyteller
Expertise
Education
Holyoke Community College – HCC-MGM Culinary Arts Institute
Marcus grew up surrounded by maple trees, farm stands, and the smell of Sunday stew simmering on the stove. After earning his Culinary Arts Certificate from the HCC-MGM Culinary Arts Institute, he knew he didn’t want to work in fancy kitchens, he wanted to cook for real people.
At Whip Up Cook Up, Marcus is the guy turning memories into meals. His recipes are fast, full of flavor, and built for home cooks who want big taste without the drama.