
Spooky Blood Splatter Cookies Recipe: Eerie & Fun Halloween Treats
Spooky halloween gatherings always spark excitement around creative blood splatter cookies that shock and delight guests.
Mysterious dark backgrounds make these treats pop with ghoulish charm.
Crimson droplets cascade across crisp sugar surfaces like macabre artwork.
Professional bakers and amateur kitchen enthusiasts can master this creepy confection with simple techniques.
Dark chocolate provides rich undertones complementing the dramatic visual effect.
Guests will marvel at your ghastly culinary creation, wondering how you achieved such realistic blood-like splatters.
Prepare to become the talk of any halloween party with these wickedly cool cookies.
Blood Splatter Cookies Ingredient Guide
Dry Ingredients:Wet Ingredients:Icing Ingredients:Decorating and Baking Blood Splatter Cookies for Halloween Fun
Step 1: Prepare Baking Space
Grab your baking sheets and line them with parchment paper. Set your oven to warm up at 350°F.
Step 2: Whip Up Cookie Dough
In a mixer, blend together:Mix until the mixture becomes light and fluffy like a cloud.
Step 3: Create Dry Ingredient Blend
In a separate bowl, combine:Gently fold the dry ingredients into the wet mixture until a smooth dough forms.
Step 4: Shape Cookie Rounds
Use a cookie scoop to create uniform dough balls. Place them on the prepared baking sheets and softly press down to flatten.
Step 5: Bake to Perfection
Slide the sheets into the preheated oven. Bake for 15-18 minutes until the edges look firm and set. Let the cookies cool completely.
Step 6: Whip Spooky Icing
Clean your mixer bowl and whip together:Beat until the mixture forms soft, billowy peaks.
Step 7: Add Bloody Color
Drop red food coloring into the icing, adjusting until you achieve a deep, menacing crimson shade.
Step 8: Thin the Icing
Add a splash of water to create a consistency that drips like lava. Cover your workspace with disposable tablecloth for easy cleanup.
Step 9: Create Blood Splatter Effect
Dip a fork into the red icing and dramatically flick it across the cookies. Let the icing dry for one hour before serving your ghoulish treats.
Spooky Cookie Tips for Blood Splatter Design
Prevent Icing Splatter Mess: Wear an apron and cover your work surface with disposable tablecloth to protect clothing and counters from food coloring stains.
Achieve Perfect Icing Consistency: Gradually add water to royal icing, testing its flow by lifting the spoon – it should drip like lava without being too runny or thick.
Master the Bloody Flick Technique: Hold the fork at a slight angle and tap it gently against another utensil to create realistic, random blood splatter patterns on cookies.
Boost Cookie Flavor Depth: Add a pinch of espresso powder or dark cocoa to the cookie dough to enhance the rich chocolate base and create more complex flavor notes.
Store for Maximum Freshness: Keep decorated cookies in an airtight container at room temperature for up to 5 days, separating layers with parchment paper to prevent sticking.
Keep Blood Splatter Cookies Looking Sharp
Blood Splatter Cookies Spooky Matches
Blood Splatter Cookies Spooky Styles
FAQs
Dip a clean fork into the red icing and flick it quickly across the surface of the cookies, varying the distance and angle to create random, realistic-looking splatter patterns.
Yes, you can bake the cookies up to 3 days in advance and store them in an airtight container. Add the blood splatter icing just before serving for the best visual effect.
Use unsweetened Dutch-processed cocoa powder for a rich, deep chocolate flavor that complements the spooky blood splatter design.
Cover your workspace with disposable table covers or plastic sheets, wear an apron, and work over a large baking sheet to contain the icing splatters.
Cookies with Sweet Blood Splatter for Spooky Fun
Print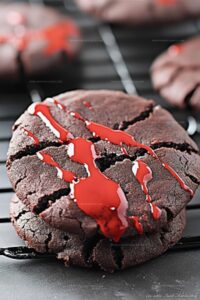
Blood Splatter Cookies Recipe
- Total Time: 50 minutes
- Yield: 24 1x
Description
Sinister blood splatter cookies bring Halloween horror right onto dessert plates, creating spine-chilling treats perfect for ghoulish gatherings. Dark chocolate cookies drizzled with crimson icing will make guests scream with delightful terror.
Ingredients
Dry Ingredients:
- 4 cups flour
- 1 cup Hershey’s dark cocoa powder
- 1 tablespoon cornstarch
- 2 teaspoons baking soda
- 1 teaspoon kosher salt
Wet Ingredients:
- 1 1/2 cups (340 grams) unsalted sweet cream butter, softened
- 3 large eggs
- 2 tablespoons light corn syrup
- 1 tablespoon pure vanilla extract
Sweeteners:
- 1 1/2 cups (300 grams) light brown sugar
- 1/2 cup (100 grams) sugar
Instructions
- Heat the oven to 350°F and prepare baking sheets with parchment paper for a non-stick surface.
- Combine butter, sugars, eggs, corn syrup, and vanilla in a mixer until the mixture transforms into a fluffy, pale composition.
- Separately blend flour, cocoa powder, cornstarch, baking soda, and salt into a uniform dry mixture.
- Gently incorporate dry ingredients into the wet mixture, creating a cohesive dark dough.
- Form dough into rounded spheres using a cookie scoop, positioning them evenly across the prepared baking sheets.
- Softly flatten each dough ball to ensure uniform cooking and attractive presentation.
- Bake cookies for 15-18 minutes, watching for firm edges and consistent coloration.
- Allow cookies to cool completely on wire racks, ensuring they reach room temperature.
- Whip egg whites with cream of tartar, powdered sugar, and vanilla until the icing develops soft, billowy peaks.
- Gradually introduce red food coloring, adjusting intensity to achieve a vivid, blood-like crimson shade.
- Thin the icing with water, creating a flowing consistency that drips elegantly from a spoon.
- Protect work surfaces with disposable covers to manage potential splattering.
- Use a fork to dramatically flick icing across cookie surfaces, mimicking dramatic blood spatter effects.
- Let decorated cookies rest for one hour, allowing icing to set and develop a polished finish.
Notes
- Check butter temperature to ensure smooth creaming, softening it at room temperature for 30 minutes prevents lumpy dough.
- Use high-quality cocoa powder for richer, deeper chocolate flavor that elevates the cookie’s taste profile.
- Cornstarch helps create a tender, soft cookie texture by reducing gluten development during mixing.
- For gluten-free version, swap wheat flour with almond or gluten-free blend, maintaining the same cookie consistency.
- Reduce sugar by 25% if preferring less sweetness, without compromising cookie structure.
- Vegetarian/vegan bakers can substitute eggs with flax eggs or applesauce for binding.
- Chill dough for 30 minutes before baking to prevent excessive spreading and maintain cookie shape.
- Use gel food coloring for more intense, vibrant red color without thinning icing consistency.
- Prep Time: 30 minutes
- Cook Time: 20 minutes
- Category: Desserts, Snacks
- Method: Baking
- Cuisine: American
Nutrition
- Serving Size: 24
- Calories: 250
- Sugar: 12g
- Sodium: 150mg
- Fat: 12g
- Saturated Fat: 7g
- Unsaturated Fat: 4g
- Trans Fat: 0g
- Carbohydrates: 35g
- Fiber: 1g
- Protein: 3g
- Cholesterol: 30mg
Marcus Hale
Founder & Recipe Storyteller
Expertise
Education
Holyoke Community College – HCC-MGM Culinary Arts Institute
Marcus grew up surrounded by maple trees, farm stands, and the smell of Sunday stew simmering on the stove. After earning his Culinary Arts Certificate from the HCC-MGM Culinary Arts Institute, he knew he didn’t want to work in fancy kitchens, he wanted to cook for real people.
At Whip Up Cook Up, Marcus is the guy turning memories into meals. His recipes are fast, full of flavor, and built for home cooks who want big taste without the drama.