Easy Cheesecake Crescent Rolls Casserole Recipe That Wows
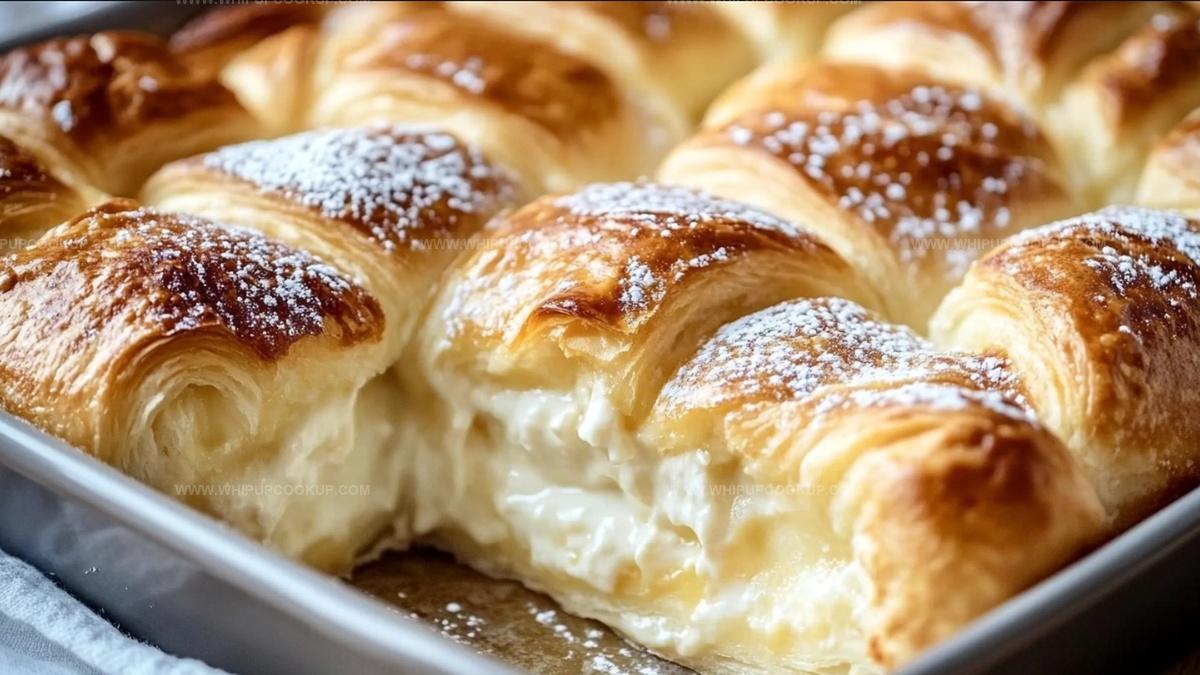
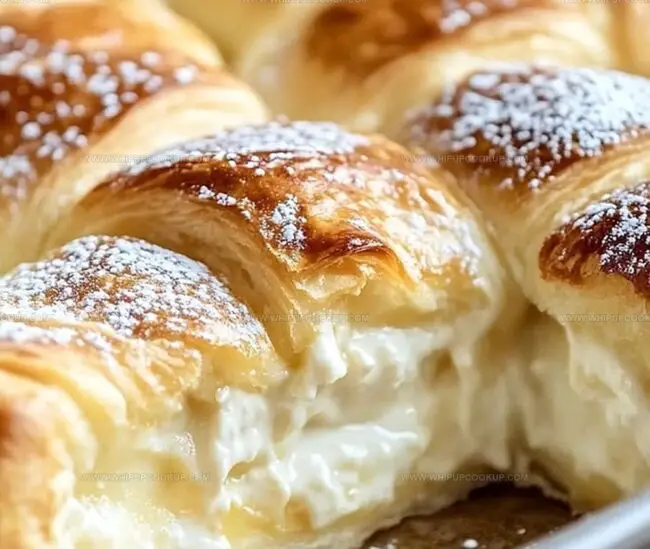
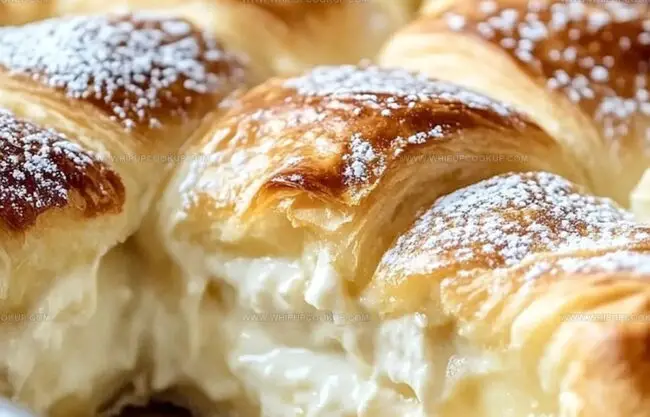
Crisp, golden crescent rolls wrapped around a luscious cheesecake filling create a decadent dessert that melts in your mouth.
This irresistible cheesecake crescent rolls casserole brings together the perfect balance of flaky pastry and creamy cheese.
Each bite promises a delightful explosion of sweet, rich flavors that dance across your palate.
The simple yet elegant dish combines classic ingredients in a way that transforms an ordinary dessert into something extraordinary.
Layers of soft, pillowy crescent dough envelop a velvety cheesecake center that will have everyone asking for seconds.
Effortless to prepare and impossible to resist, this casserole turns an everyday treat into a show-stopping dessert that’ll have you reaching for another slice.
Prepare to indulge in a dessert that’s sure to become a new family favorite.
What Makes Cheesecake Crescent Rolls So Addictive
Key Ingredients for Crescent Roll Cheesecake
Main Ingredients:Easy Guide to Cheesecake Crescent Roll Casserole
Step 1: Warm Up the Oven
Turn on the oven and set it to 350°F.
Grab a 9×13-inch baking dish and give it a quick spray with cooking oil or rub it down with butter to prevent sticking.
Step 2: Create the Bottom Layer
Open the first can of crescent roll dough and carefully spread it across the bottom of the dish.
Press down firmly to seal all the little seams, creating a smooth, even foundation for your delicious treat.
Step 3: Whip Up the Creamy Filling
Grab a mixing bowl and combine these ingredients:Blend everything until it becomes silky smooth.
Carefully spread this dreamy mixture over the bottom crescent roll layer, making sure it covers every inch.
Step 4: Add the Top Crust
Unroll the second can of crescent roll dough and gently place it on top of the cream cheese layer.
Pinch the edges together to seal in all that creamy goodness.
Step 5: Dress It Up
Pour melted butter over the entire top layer.
In a small bowl, mix together:Sprinkle this sweet and spicy mixture evenly across the surface.
Step 6: Bake to Perfection
Slide the dish into the preheated oven and bake for 30-35 minutes.
You’re looking for a beautiful golden-brown top and a set filling.
Once done, pull it out and let it cool for a few minutes before cutting into slices.
Tips to Get That Flaky Golden Crust
How to Store and Heat Up Cheesecake Crescent Rolls
Tasty Sides or Drinks for This Casserole
Sweet Variations for Crescent Cheesecake Casserole
FAQs
Yes, you can substitute low-fat cream cheese, but the texture and richness might be slightly different from the original recipe.
No, this recipe uses traditional crescent roll dough which contains gluten. You would need to use gluten-free crescent roll alternatives to make it suitable.
The filling should look firm and not jiggle when you gently shake the baking dish. A golden-brown top is also a good indicator that the dessert is fully baked.
You can assemble the casserole and refrigerate it overnight before baking. Just add an extra 5-10 minutes to the baking time if you’re baking it straight from the refrigerator.
Print
Cheesecake Crescent Rolls Casserole Recipe
- Total Time: 50 minutes
- Yield: 8 1x
Description
Sweet and flaky cheesecake crescent rolls casserole brings comfort right to kitchen tables with minimal effort. Creamy filling nestled in buttery pastry creates irresistible harmony that beckons you to savor each delightful bite.
Ingredients
Main Ingredients:
- 2 cans (8 ounces/226 grams each) refrigerated crescent roll dough
- 2 packages (8 ounces/226 grams each) cream cheese, softened
- 1 cup (200 grams) granulated sugar
Flavor Enhancers:
- 1 teaspoon vanilla extract
- 1 teaspoon ground cinnamon
Topping Ingredients:
- 1/4 cup (57 grams/4 tablespoons) unsalted butter, melted
- 1/4 cup (50 grams) granulated sugar
Instructions
- Prepare the baking environment by warming the oven to 350°F (175°C) and coating a 9×13-inch baking dish with a light layer of grease.
- Carefully unfurl the first crescent roll dough, gently pressing it into the dish’s bottom, meticulously sealing all seam lines to create a smooth, uniform foundation.
- Craft the luxurious filling by blending cream cheese, sugar, and vanilla extract until achieving a silky, homogeneous consistency, then distribute this creamy mixture evenly across the initial dough layer.
- Delicately drape the second crescent roll dough over the cream cheese filling, ensuring complete coverage and pinching the edges to marry the top and bottom layers seamlessly.
- Transform the surface by lavishly brushing melted butter across the entire top layer, then generously dust the buttered landscape with a harmonious blend of sugar and cinnamon.
- Transfer the assembled casserole to the preheated oven, allowing it to bake for 30-35 minutes until the surface develops a rich, golden-brown complexion and the interior sets with a gentle firmness.
- Once removed from the oven, permit the dish to cool momentarily, letting the layers settle and flavors meld before slicing into decadent portions.
Notes
- Customize Crust: Use gluten-free crescent roll dough for a celiac-friendly version, ensuring everyone can enjoy this delightful dessert.
- Temperature Precision: Monitor oven carefully as golden-brown color indicates perfect doneness without burning the delicate pastry layers.
- Make-Ahead Magic: Prepare the entire casserole night before, refrigerate, and bake fresh in the morning for hassle-free breakfast or brunch.
- Flavor Variations: Experiment with different extracts like almond or orange to add unexpected depth to the cream cheese filling.
- Prep Time: 15 minutes
- Cook Time: 30-35 minutes
- Category: Desserts, Breakfast
- Method: Baking
- Cuisine: American
Nutrition
- Serving Size: 8
- Calories: 305
- Sugar: 18 g
- Sodium: 300 mg
- Fat: 17 g
- Saturated Fat: 10 g
- Unsaturated Fat: 5 g
- Trans Fat: 0 g
- Carbohydrates: 34 g
- Fiber: 1 g
- Protein: 4 g
- Cholesterol: 45 mg
Marcus Hale
Founder & Recipe Storyteller
Expertise
Education
Holyoke Community College – HCC-MGM Culinary Arts Institute
Marcus grew up surrounded by maple trees, farm stands, and the smell of Sunday stew simmering on the stove. After earning his Culinary Arts Certificate from the HCC-MGM Culinary Arts Institute, he knew he didn’t want to work in fancy kitchens, he wanted to cook for real people.
At Whip Up Cook Up, Marcus is the guy turning memories into meals. His recipes are fast, full of flavor, and built for home cooks who want big taste without the drama.