
The Dreamiest Cherry Cheesecake Fluff Recipe Ever Made
Sweet dreams come alive with this irresistible cherry cheesecake fluff that promises pure dessert magic.
Light clouds of creamy goodness dance between tangy cream cheese and fruity cherry swirls.
Soft marshmallow textures mingle with delicate graham cracker crumbs for an unexpected treat.
No baking means zero kitchen stress and maximum deliciousness.
Summer parties or cozy winter nights become instantly brighter with this simple indulgence.
Each spoonful delivers a perfect balance of smooth and zesty flavors.
You’ll fall in love with how quickly this dessert comes together.
Dive into this delectable recipe and let your taste buds celebrate!
FAQs
You can swap out vanilla extract with almond extract for a different flavor profile. Use low-fat cream cheese if you want a lighter version, and replace heavy whipping cream with whipped topping for a quicker preparation.
Absolutely! Kids love the sweet, marshmallow-studded texture and fruity cherry flavor. The no-bake method means children can help with mixing and preparing without using hot surfaces or complicated techniques.
When stored in an airtight container in the refrigerator, the Cherry Cheesecake Fluff will maintain its delicious texture and taste for 3-4 days. Cover tightly to prevent it from absorbing other refrigerator odors.
Yes, this is an excellent make-ahead dessert. Prepare it up to 24 hours before serving, keeping it refrigerated. The flavors actually develop and blend better when chilled overnight, making it perfect for dinner parties or potlucks.
Cheesecake Fluff That’s Quick, Creamy, and Cherry-Sweet
Cherry Cheesecake Fluff Ingredient Guide
Dairy Base:Sweeteners and Flavors:Fruit and Texture Enhancers:Garnish:Cherry Cheesecake Fluff Dessert Assembly Guide
Step 1: Whip Cream Cheese
Beat the cream cheese in a large bowl until it becomes smooth and creamy, ensuring no lumps remain. Use an electric mixer for the best results.
Step 2: Create Sweet Base
Add powdered sugar and vanilla extract to the cream cheese. Continue beating until the mixture becomes light and fluffy with a silky texture.
Step 3: Prepare Whipped Cream
In a separate bowl, whip heavy cream until stiff peaks form. The cream should stand up tall and hold its shape when the whisk is lifted.
Step 4: Blend Cream Mixtures
Gently fold the whipped cream into the cream cheese mixture. Use a spatula with smooth, circular motions to keep the mixture light and airy.
Step 5: Add Delicious Mix-Ins
Incorporate the mix-ins into the creamy base:Fold these ingredients carefully to maintain the fluffy texture.
Step 6: Chill and Set
Transfer the mixture to a serving bowl. Refrigerate for at least 1 hour to allow flavors to meld and the dessert to set completely.
Step 7: Garnish and Serve
Before serving, sprinkle graham cracker crumbs on top for a delightful crunch. Optional garnish includes fresh cherries for an extra pop of color and flavor.
Step 8: Enjoy Cold Delight
Serve chilled and savor each creamy, fruity spoonful of this irresistible no-bake dessert.
Fluff Tips for Cherry Cheesecake No-Bake Dessert
Storing Cherry Cheesecake Fluff the Right Way
Cherry Cheesecake Fluff Pairing Ideas
Elevate Sweet Cherry Bliss Moments:Cherry Cheesecake Fluff Flavor Swaps
Print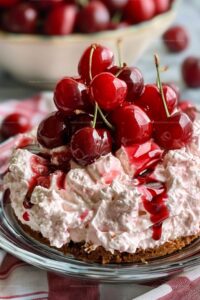
Cherry Cheesecake Fluff Recipe
- Total Time: 20 minutes
- Yield: 8 1x
Description
Creamy cherry cheesecake fluff whisks classic dessert flavors into a light, dreamy cloud of deliciousness. Smooth cream cheese, tangy cherries, and pillowy whipped texture make this sweet treat irresistible for quick summer gatherings.
Ingredients
Main Ingredients:
- 1 (21 ounces / 595 grams) can cherry pie filling
- 8 ounces (226 grams) cream cheese, softened
- 1 cup heavy whipping cream
Sweeteners and Flavor Enhancers:
- 1 cup powdered sugar
- 1 teaspoon vanilla extract
- 1 cup mini marshmallows
- 1 (8 ounces / 226 grams) tub whipped topping (like Cool Whip), thawed
Garnish and Optional Ingredients:
- 1 cup graham cracker crumbs
- Fresh cherries
Instructions
- Vigorously whisk cream cheese in a spacious mixing vessel until achieving a silky, uniform consistency.
- Incorporate powdered sugar and vanilla extract, continuing to blend until the mixture transforms into a light, airy texture.
- In a separate container, vigorously whip heavy cream until it develops sturdy, defined peaks.
- Delicately integrate the whipped cream into the cream cheese base, ensuring a harmonious blend without deflating the mixture.
- Gently introduce cherry pie filling, transforming the dessert with vibrant crimson swirls.
- Fold in whipped topping, creating additional volume and creamy richness.
- Sprinkle mini marshmallows throughout, adding playful texture and subtle sweetness.
- Transfer the decadent mixture into an elegant serving dish, allowing it to chill and set in the refrigerator for a minimum of 60 minutes.
- Just before presenting, dust the surface with graham cracker crumbs for a delightful crunch.
- Optionally, embellish with fresh cherries to enhance visual appeal and provide a burst of natural fruity flavor.
- Serve thoroughly chilled, inviting guests to indulge in this luxurious, no-bake confection.
Notes
- Whip cream cheese thoroughly to eliminate lumps, ensuring a silky smooth texture for the dessert.
- Use cold heavy whipping cream for faster and more stable peak formation during whipping.
- Replace mini marshmallows with additional whipped topping for a lighter, less sweet version of the fluff.
- Opt for sugar-free cherry pie filling and low-fat cream cheese to create a lower-calorie alternative for health-conscious dessert lovers.
- Prep Time: 20 minutes
- Cook Time: 0 minutes
- Category: Desserts
- Method: None
- Cuisine: American
Nutrition
- Serving Size: 8
- Calories: 320
- Sugar: 27 g
- Sodium: 90 mg
- Fat: 24 g
- Saturated Fat: 14 g
- Unsaturated Fat: 8 g
- Trans Fat: 0 g
- Carbohydrates: 30 g
- Fiber: 1 g
- Protein: 3 g
- Cholesterol: 70 mg
Marcus Hale
Founder & Recipe Storyteller
Expertise
Education
Holyoke Community College – HCC-MGM Culinary Arts Institute
Marcus grew up surrounded by maple trees, farm stands, and the smell of Sunday stew simmering on the stove. After earning his Culinary Arts Certificate from the HCC-MGM Culinary Arts Institute, he knew he didn’t want to work in fancy kitchens, he wanted to cook for real people.
At Whip Up Cook Up, Marcus is the guy turning memories into meals. His recipes are fast, full of flavor, and built for home cooks who want big taste without the drama.