
The Dreamy Cherry Pie Bars Recipe Everyone Adores
Sweet summer memories dance through this cherry pie bars creation that promises pure deliciousness.
Memories of grandma’s kitchen might spark when you slice into these heavenly treats.
Juicy cherries nestled between buttery layers create a dessert that feels like a warm embrace.
Crisp pastry crumbles perfectly against soft fruit filling, making each bite a delightful experience.
Simple ingredients come together in a magical way to craft something truly special.
Local cherries shine brightest in this straightforward yet elegant recipe.
Pie Bars That Taste Just Like Homemade Cherry Pie
Cherry Pie Bars Pantry Breakdown
Crust Ingredients:Fruit Filling:Topping Ingredients:Cherry Pie Bars Baking Instructions
Step 1: Prepare Baking Station
Crank up the oven to a toasty 350°F. Grab your 9×13-inch baking dish and give it a quick spray of cooking oil or line it with parchment paper for easy cleanup.
Step 2: Create Crumbly Dough Base
Grab a spacious mixing bowl and toss in:Blend these dry ingredients until they’re looking friendly together.
Step 3: Work in Butter Magic
Drop in cold vegan butter cubes. Use your fingertips or a pastry cutter to massage the butter into the flour mixture. Keep working until the texture looks like chunky sand or rough breadcrumbs.
Step 4: Bind the Dough
Slowly drizzle in ice-cold water, one tablespoon at a time. Gently mix until the dough starts to hold together but doesn’t look wet or sticky.
Step 5: Create Crust and Topping
Split the dough into two equal portions. Take the first half and press it evenly across the bottom of your prepared baking dish. This becomes your delicious pie bar foundation. Set the remaining dough aside for the crumbly topping.
Step 6: Prepare Cherry Filling
In another bowl, combine:Stir until cherries are well-coated and glossy.
Step 7: Assemble and Bake
Spread the cherry mixture over the pressed dough base. Crumble the remaining dough on top to create a rustic, golden topping. Slide into the preheated oven.
Step 8: Bake to Perfection
Bake for about 45-50 minutes. Look for a golden-brown top and bubbling cherry filling. The edges should be crisp and enticing.
Step 9: Cool and Slice
Remove from the oven and let cool completely in the pan. This helps the bars set perfectly. Once cooled, slice into square or rectangular pieces.
Step 10: Serve and Enjoy
Plate up these cherry pie bars and watch everyone’s eyes light up. Optional: Add a scoop of vanilla ice cream or a dusting of powdered sugar for extra wow factor.
What Works for Cherry Pie Bars
Cherry Pie Bars Save Them Soft And Sweet
Cherry Pie Bars Great Matches
Cherry Pie Bars: Topping Swap Ideas
FAQs
Absolutely! Thaw and drain frozen cherries completely before using to prevent excess moisture in your bars.
No, the recipe contains whole-wheat and all-purpose flour. To make it gluten-free, you’ll need to substitute with gluten-free flour blends.
Look for golden brown edges and a set center. The top should look slightly firm and not jiggly when gently shaken.
Yes, you can prepare the dough and filling a day in advance and assemble just before baking. Assembled unbaked bars can be refrigerated for up to 24 hours before baking.
Print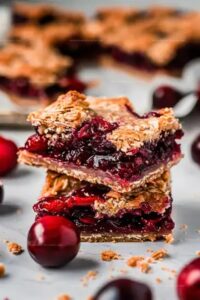
Cherry Pie Bars Recipe
- Total Time: 1 hour 10 minutes
- Yield: 12 1x
Description
Homemade cherry pie bars bring classic American dessert comfort right to your kitchen. Sweet, buttery pastry layers packed with rich cherry filling create a delightful treat that connects generations of bakers with pure, simple pleasure.
Ingredients
Main Ingredients (Crust):
- 1 cup whole-wheat flour
- 1 cup all-purpose flour
- 6 tablespoons cold salted vegan butter, cubed
Sweeteners:
- 2 tablespoons granulated sugar
Liquid:
- 78 tablespoons ice water
Instructions
- Prepare the baking vessel by coating a 9×13-inch pan with non-stick spray or parchment paper, ensuring complete coverage for easy removal.
- Create the foundational pastry mixture by blending whole-wheat and all-purpose flours with granulated sugar in a spacious mixing bowl.
- Incorporate cold vegan butter into the flour mixture, using fingertips or a pastry cutter to transform the ingredients into a texture resembling rough, uneven crumbs.
- Introduce ice water gradually, one tablespoon at a time, gently combining until the dough coheres without becoming overly saturated.
- Strategically divide the dough into two equal portions, with one half destined to form the bottom crust layer within the prepared pan.
- Methodically press the first dough portion across the pan’s surface, establishing an even, uniform base that covers the entire bottom.
- Set aside the remaining dough portion for constructing the delicate top layer that will crown the cherry filling.
- Layer the cherries across the pressed crust, distributing them evenly to guarantee a consistent fruit presence in each bar.
- Crumble the reserved dough over the cherry layer, creating a rustic, textured topping that will transform during baking.
- Transfer the assembled bars to the preheated oven, baking until the edges turn golden and the top achieves a delicate, crisp appearance.
- Remove from the oven and allow the bars to cool completely, enabling the filling to set and the flavors to harmonize.
Notes
- Experiment with gluten-free flour blends like almond or coconut flour for those with wheat sensitivities.
- Use coconut oil or plant-based margarine as a substitute for vegan butter to adjust the texture and flavor profile.
- Refrigerate the dough for 15-20 minutes before pressing into the pan to prevent crumbling and enhance the crust’s structure.
- Swap fresh cherries with other seasonal berries like raspberries or blueberries for a delightful twist on the classic recipe.
- Prep Time: 30 minutes
- Cook Time: 40 minutes
- Category: Desserts
- Method: Baking
- Cuisine: American
Nutrition
- Serving Size: 12
- Calories: 150
- Sugar: 2 g
- Sodium: 100 mg
- Fat: 7 g
- Saturated Fat: 1 g
- Unsaturated Fat: 5 g
- Trans Fat: 0 g
- Carbohydrates: 20 g
- Fiber: 2 g
- Protein: 3 g
- Cholesterol: 0 mg
Marcus Hale
Founder & Recipe Storyteller
Expertise
Education
Holyoke Community College – HCC-MGM Culinary Arts Institute
Marcus grew up surrounded by maple trees, farm stands, and the smell of Sunday stew simmering on the stove. After earning his Culinary Arts Certificate from the HCC-MGM Culinary Arts Institute, he knew he didn’t want to work in fancy kitchens, he wanted to cook for real people.
At Whip Up Cook Up, Marcus is the guy turning memories into meals. His recipes are fast, full of flavor, and built for home cooks who want big taste without the drama.