
The Perfect Classic Vanilla Fudge Recipe for Sweet Treats
Crafting a delectable classic vanilla fudge recipe brings pure joy to sweet-toothed adventurers seeking creamy perfection.
Sugar crystals dance with butter in a magical culinary transformation.
Smooth textures and rich flavors promise an irresistible treat that melts effortlessly on your tongue.
Childhood memories of grandma’s kitchen come flooding back with each silky bite.
Simple ingredients combine to create something extraordinary beyond basic dessert expectations.
Culinary magic happens when you whisk together these humble components into a decadent confection.
You won’t believe how easy it is to create this mouthwatering delicacy that will have everyone begging for seconds.
Why Classic Vanilla Fudge Feels Special
Maple Nut Fudge Pantry Must-Haves
Main Ingredients:Flavor Enhancers:How to Make Classic Vanilla Fudge
Step 1: Create Sweet Candy Base
Grab a large saucepan and combine these delightful ingredients:Whisk everything together until the mixture looks silky smooth. Place the pan over medium-low heat and let it start bubbling gently.
Step 2: Track Temperature Perfectly
Attach a candy thermometer to the saucepan’s side. Cook the mixture without stirring, watching carefully until it reaches exactly 240°F. Take the pan off the heat immediately when you hit that magic number.
Step 3: Rest and Add Flavor
Let the mixture calm down until the bubbling stops completely. Now sprinkle these magical ingredients on top:Don’t stir yet! Allow everything to sit and mingle for about 20 minutes until the mixture feels warm but not hot.
Step 4: Beat Into Smooth Submission
Pull out your hand mixer and beat the mixture on medium-low speed. Keep mixing for 1-3 minutes until the fudge transforms, becoming thick and losing its glossy shine.
Step 5: Set and Serve
Quickly pour the fudge into a buttered or parchment-lined dish. Smooth out the surface if needed. Let the fudge set for around 20 minutes before slicing into delectable squares.
Fudge Tips That Keep Vanilla Classic and Creamy
How To Store Classic Vanilla Fudge Properly
Winter Fruit Salad Pairing Tips
Maple Nut Fudge Sweet Style Options
FAQs
You’ll need sugar, salt, half-and-half, corn syrup, butter, and vanilla extract. These simple pantry staples create a rich, creamy fudge with minimal effort.
Yes, a candy thermometer is crucial. It helps you precisely hit the 240°F soft-ball stage, which is key to achieving the perfect fudge texture. Without it, your fudge might be too soft or too hard.
Stirring can cause sugar crystals to form, making your fudge grainy instead of smooth. Let the mixture cook undisturbed to ensure a silky, creamy result.
Beat the mixture for 1-3 minutes on medium-low speed. You’ll know it’s ready when it thickens and loses its glossy shine, which signals it’s time to pour into the pan.
Print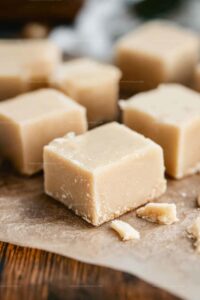
Classic Vanilla Fudge Recipe
- Total Time: 40 minutes
- Yield: 12 1x
Description
Sweet temptations begin with this classic vanilla fudge recipe, a creamy confection that whispers nostalgic memories of grandma’s kitchen. Smooth, rich cubes melt effortlessly on your palate, inviting pure indulgence with each delectable bite.
Ingredients
Main Ingredients:
- 2.25 cups granulated sugar
- 2/3 cup half-and-half
- 3 tablespoons butter
Flavor and Enhancers:
- 1 tablespoon vanilla extract
- 1 tablespoon corn syrup
Additional Seasoning:
- 1/2 teaspoon salt
Instructions
- Gather a heavy-bottomed saucepan and combine sugar, salt, half-and-half, and corn syrup, whisking until the mixture achieves a uniform consistency.
- Position the pan over medium-low heat, allowing the ingredients to meld together and gradually reach a gentle, rolling boil without aggressive stirring.
- Securely attach a precise candy thermometer to monitor the temperature, continuing to cook without disturbing the mixture until it precisely hits 240°F.
- Immediately remove the pan from heat source, allowing the molten mixture to settle and cease its vigorous bubbling.
- Gently introduce butter and vanilla extract across the surface, permitting them to rest undisturbed for approximately 20 minutes until the temperature moderates.
- Employ a hand mixer, setting it to medium-low speed, and systematically beat the cooling mixture for 1-3 minutes until it visibly transforms, losing its glossy sheen and developing a thicker texture.
- Swiftly transfer the fudge to a prepared pan lined with parchment or generously buttered, using a spatula to create an even surface.
- Allow the fudge to set and solidify for around 20 minutes before carefully slicing into uniform, delectable squares.
Notes
- Prevent Sugar Crystallization by carefully dissolving sugar without scraping down sides during initial heating to ensure smooth, creamy texture.
- Invest in a reliable candy thermometer for precise temperature control, as even a few degrees can dramatically change fudge consistency.
- Use room temperature ingredients to help achieve optimal mixing and reduce potential temperature shock during cooking process.
- Consider dairy alternatives like coconut cream or condensed milk for lactose-intolerant individuals, which can provide similar richness and mouthfeel.
- Prep Time: 10 minutes
- Cook Time: 30 minutes
- Category: Desserts, Snacks
- Method: Boiling
- Cuisine: American
Nutrition
- Serving Size: 12
- Calories: 192.5 kcal
- Sugar: 17.8 g
- Sodium: 0.1 g
- Fat: 4.5 g
- Saturated Fat: 2.7 g
- Unsaturated Fat: 1.8 g
- Trans Fat: 0 g
- Carbohydrates: 30.9 g
- Fiber: 0 g
- Protein: 0.3 g
- Cholesterol: 10 mg
Marcus Hale
Founder & Recipe Storyteller
Expertise
Education
Holyoke Community College – HCC-MGM Culinary Arts Institute
Marcus grew up surrounded by maple trees, farm stands, and the smell of Sunday stew simmering on the stove. After earning his Culinary Arts Certificate from the HCC-MGM Culinary Arts Institute, he knew he didn’t want to work in fancy kitchens, he wanted to cook for real people.
At Whip Up Cook Up, Marcus is the guy turning memories into meals. His recipes are fast, full of flavor, and built for home cooks who want big taste without the drama.