Spooky Ghastly Candy Bark Recipe: A Haunting Sweet Treat
Dark chocolate lovers often stumble upon a ghastly candy bark that defies ordinary Halloween treat expectations.
Haunting swirls of melted chocolate create dramatic patterns across a smooth surface.
Shadows and unexpected flavor combinations lurk within each delectable piece.
Mysterious ingredients promise a spine-chilling culinary adventure that challenges traditional sweet-making techniques.
Intricate decorations whisper tales of playful spookiness through carefully placed sugar elements.
Unexpected textures and rich chocolate depths invite curious cooks to experiment.
You won’t believe how simple this wickedly delightful dessert becomes with a few clever tricks.
Candy Bark That’s Perfect for Last-Minute Halloween Treats
Ghastly Halloween Candy Bark Pantry Essentials
Chocolate Base:Decorative Elements:Finishing Touches:Ghastly Halloween Candy Bark Quick Treat Guide
Step 1: Prepare Dark Chocolate Base
Grab dark chocolate and melt it carefully in a microwave-safe bowl. Use short 10-second bursts, stirring between each heating to prevent burning. Line an 8″ x 8″ baking dish with plastic wrap, then spread the smooth melted chocolate evenly across the surface. For extra crunch, sprinkle in some chopped cookies or candies. Pop the tray into the refrigerator and let it chill until completely firm.
Step 2: Create White Chocolate Layer
Melt white chocolate in a separate bowl until completely smooth. Gently pour and spread the white chocolate over the hardened dark chocolate base. Return the tray to the refrigerator to set completely.
Step 3: Add Decorative Dark Chocolate Topping
Melt additional dark chocolate in a microwave-safe bowl. Pour most of the chocolate over the white chocolate layer, creating an even surface. Transfer a small portion of the dark chocolate to a piping bag for detailed decorations.
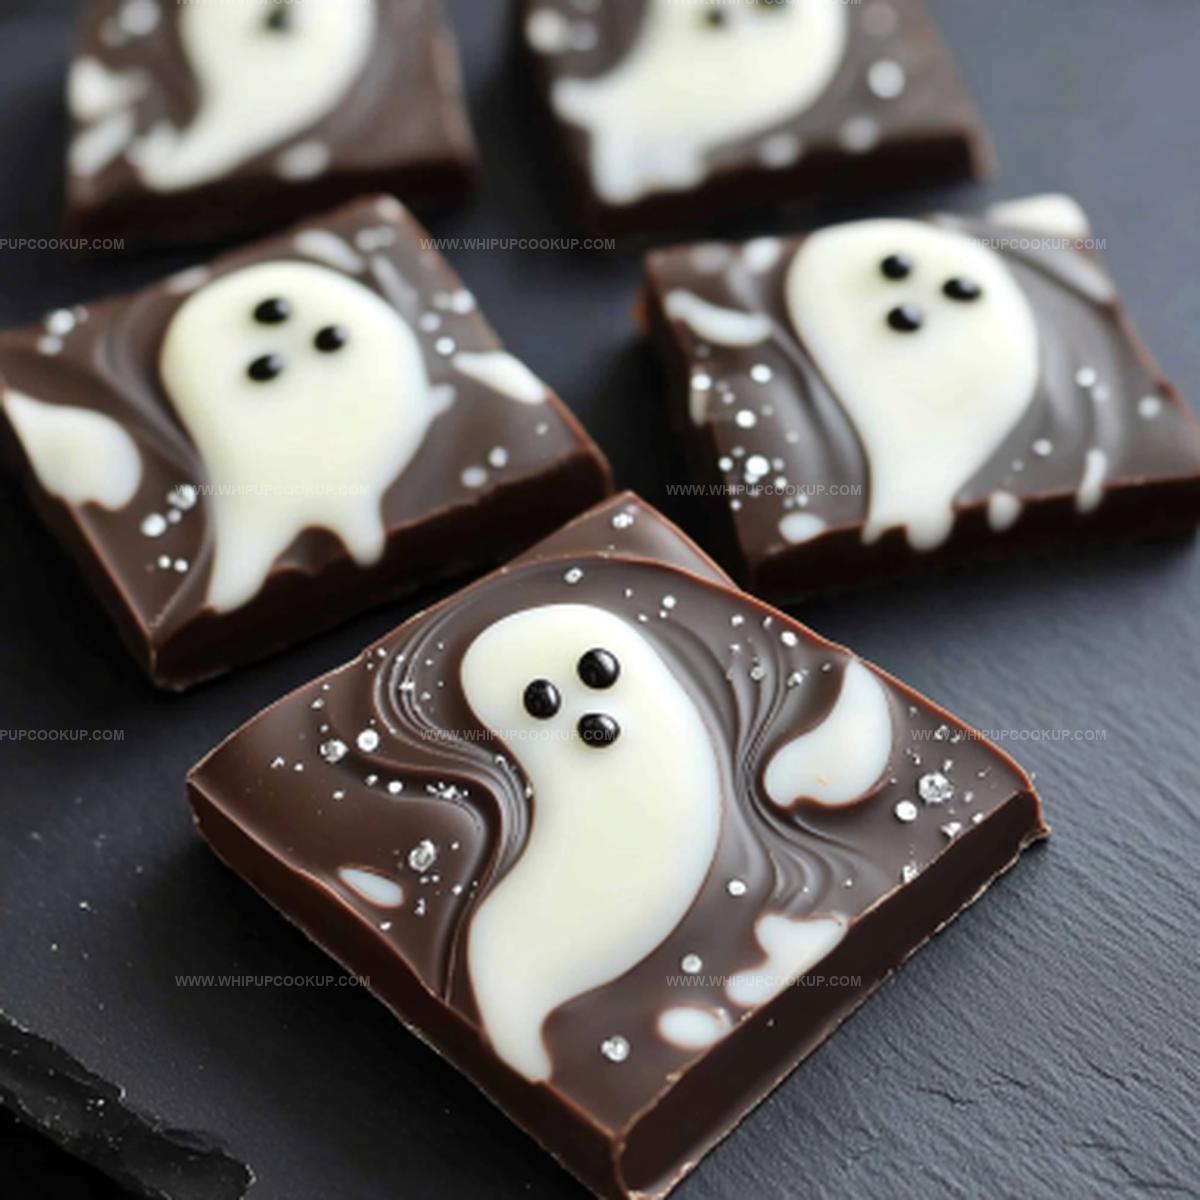
Step 4: Craft Ghostly Designs
Melt white chocolate in another bowl. Fill a separate piping bag with the white chocolate. Pipe small circular shapes across the dark chocolate surface to create ghost outlines. Use a toothpick to drag one side of each circle, forming a ghostly tail effect.
Step 5: Add Spooky Ghost Faces
Take the dark chocolate piping bag and carefully add tiny dots for eyes and mouths on the white chocolate ghosts. Sprinkle Halloween-themed decorative candies or sprinkles across the bark for extra festive flair.
Step 6: Final Chilling
Place the chocolate bark in the refrigerator and let it set completely until rock solid. Once hardened, break or cut into irregular pieces for a hauntingly delicious Halloween treat.
Step 7: Serve and Enjoy
Remove the bark from the refrigerator and break into uneven pieces. Serve on a spooky Halloween platter and watch everyone’s eyes light up with delight!
Halloween Bark Tips for Last-Minute Spooky Treats
Storing Ghastly Candy Bark Without Losing Crunch
Candy Bark for Halloween Snack Matches
Ghastly Candy Bark Fun Spins
FAQs
This recipe is super easy and beginner-friendly. You only need a microwave, some basic kitchen tools, and a little patience to create a spooky treat.
No special equipment is required. Just use a microwave-safe bowl, a baking dish, plastic wrap, piping bags (or plastic bags), and a toothpick for creating ghost details.
Absolutely! You can use milk chocolate or white chocolate instead of dark chocolate. Just ensure you have similar chocolate bar quantities for the layering process.
The total preparation time is around 30-40 minutes, including melting, layering, and chilling periods. Most of this time is waiting for chocolate layers to set in the refrigerator.
Print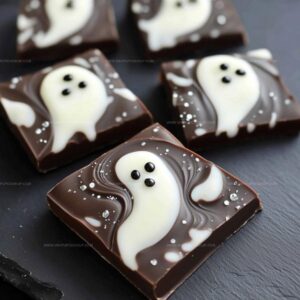
Ghastly Candy Bark Recipe
- Total Time: 1 hour 5 minutes
- Yield: 12 1x
Description
Ghastly Candy Bark brings spine-chilling Halloween spirit to sweet treats with a wickedly delightful blend of chocolate and spooky toppings. Dark chocolate becomes a canvas for creepy decorations, inviting you to unleash your inner mad confectioner.
Ingredients
Main Ingredients:
- 6 bars dark chocolate
- 3 bars white chocolate
Decorative Toppings:
- Assorted sprinkles (optional)
Instructions
- Carefully melt dark chocolate in a microwave-safe bowl, using brief 10-second intervals and stirring between each heating to prevent burning.
- Prepare an 8″ x 8″ baking dish by lining it completely with plastic wrap, ensuring smooth coverage to facilitate easy removal later.
- Pour the melted dark chocolate into the lined dish, creating an even, uniform layer that covers the entire surface. Sprinkle optional candy or cookie pieces across the chocolate for added texture and crunch.
- Chill the dark chocolate layer in the refrigerator until it becomes completely firm and solid.
- Gently melt white chocolate in a separate microwave-safe bowl, taking care to avoid overheating.
- Spread the melted white chocolate smoothly over the chilled dark chocolate base, ensuring complete and even coverage.
- Return the bark to the refrigerator and allow the white chocolate layer to set completely.
- Melt the remaining dark and white chocolate in separate bowls, preparing them for the decorative top layer.
- Transfer the dark chocolate to a piping bag, ready for precise ghost creation.
- Cover the white chocolate layer with the remaining dark chocolate, creating a rich, smooth surface.
- Using the white chocolate in a piping bag, carefully create ghost shapes by forming small circular blobs across the warm dark chocolate.
- Utilize a toothpick to elongate one side of each white chocolate circle, crafting ghostly tails with a delicate, fluid motion.
- With the dark chocolate piping bag, add facial features to the ghosts – small dot eyes and whimsical mouths that bring the spectral shapes to life.
- If desired, scatter festive Halloween sprinkles across the surface for extra visual appeal.
- Refrigerate the completed bark until it becomes completely hardened and set.
- Once fully chilled, break or slice the bark into irregular, ghost-friendly pieces and serve.
Notes
- Melt chocolate slowly and gently to prevent seizing or burning, which can ruin the smooth texture and glossy appearance.
- Use a spatula or offset knife to spread chocolate evenly, ensuring uniform thickness and professional-looking results.
- Allow each chocolate layer to completely set before adding the next, preventing unwanted blending and maintaining distinct layers.
- Swap traditional sprinkles with Halloween-themed candies like candy corn, black and orange M&Ms, or edible googly eyes for extra spooky flair.
- Prep Time: 20 minutes
- Cook Time: 45 minutes
- Category: Snacks, Desserts
- Method: Cooling
- Cuisine: American
Nutrition
- Serving Size: 12
- Calories: 200
- Sugar: 20 g
- Sodium: 50 mg
- Fat: 12 g
- Saturated Fat: 7 g
- Unsaturated Fat: 3 g
- Trans Fat: 0 g
- Carbohydrates: 25 g
- Fiber: 2 g
- Protein: 2 g
- Cholesterol: 5 mg
Marcus Hale
Founder & Recipe Storyteller
Expertise
Education
Holyoke Community College – HCC-MGM Culinary Arts Institute
Marcus grew up surrounded by maple trees, farm stands, and the smell of Sunday stew simmering on the stove. After earning his Culinary Arts Certificate from the HCC-MGM Culinary Arts Institute, he knew he didn’t want to work in fancy kitchens, he wanted to cook for real people.
At Whip Up Cook Up, Marcus is the guy turning memories into meals. His recipes are fast, full of flavor, and built for home cooks who want big taste without the drama.