
Sweet & Savory Homemade Peanut Butter & Sweet Potato Dog Chews Recipe
Crafting delectable homemade peanut butter and sweet potato dog chews can transform your furry friend’s snack time into a nutritious adventure.
Canine companions always appreciate wholesome treats prepared with love and care.
These simple chews pack incredible flavor and health benefits your pup will adore.
Nutrition experts agree that homemade treats support better digestion and maintain optimal energy levels.
Natural ingredients work magic in creating tasty rewards that keep tails wagging.
Mixing sweet potatoes with protein-rich peanut butter ensures a balanced, delightful snack packed with essential nutrients.
You can watch pure joy spark in those adorable eyes when serving these homemade delights.
Peanut Butter & Sweet Potato Dog Chews Ingredient List
Main Ingredients:Flour Components:Additional Ingredients:How to Prepare Peanut Butter and Sweet Potato Dog Chews
Step 1: Prepare Sweet Potato Base
Wash the sweet potato thoroughly. Peel and slice into small, even cubes. Steam or boil the cubes until they become soft and tender. Mash the cooked sweet potato completely, creating a smooth puree. Let the mashed potato cool down to room temperature.
Step 2: Create Dough Magic
Grab a large mixing bowl. Add the cooled sweet potato mash. Mix in these ingredients:Blend all ingredients until a cohesive dough forms. The mixture should be slightly sticky but easy to handle.
Step 3: Shape Tasty Doggy Treats
Dust a clean surface with flour. Roll out the dough to a quarter-inch thickness. Use a bone-shaped cookie cutter or knife to create cute treat shapes. Arrange the cut treats on a parchment-lined baking sheet.
Step 4: Bake to Perfection
Warm the oven to 350°F. Place the baking sheet inside. Bake the treats for 20-25 minutes. Watch for golden edges and firm texture. The chews should look slightly crisp but not burnt.
Step 5: Cool and Store
Remove treats from the oven. Let them cool completely on a wire rack. Once cooled, store in an airtight container. These homemade chews can be kept at room temperature for up to a week.
Homemade Tips for Sweet Potato Dog Chews
Dog Treats Made With Sweet Potato and Peanut Butter Save With Ease
Sweet Potato PB Chews for Dogs Tips
Sweet Potato Peanut Butter Dog Chew Ideas
FAQs
Most dogs can enjoy these treats, but always consult your veterinarian first, especially if your dog has allergies to peanut butter, eggs, or wheat.
Yes, you can use alternatives like gluten-free flour, use a different nut butter, or replace eggs with mashed banana for dogs with sensitivities.
Treats should make up no more than 10% of your dog’s daily caloric intake. Start with small portions and monitor your dog’s reaction.
Puppies over six months can typically enjoy these treats, but introduce new foods gradually and in small amounts to prevent digestive issues.
Chews That Mix Peanut Butter and Sweet Potato for Happy Pups
Print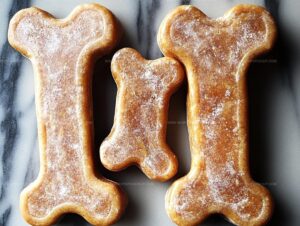
Homemade Peanut Butter & Sweet Potato Dog Chews Recipe
- Total Time: 1 hour 5 minutes
- Yield: 10 1x
Description
Pampered pups will howl with delight over these homemade peanut butter & sweet potato dog chews, packed with wholesome goodness. Canine companions savor each nutrient-rich bite, making mealtime a tail-wagging celebration of love and care.
Ingredients
Main Protein and Flavor Ingredients:
- 1/2 cup peanut butter
- 1 egg
Starch and Grain Ingredients:
- 1 large sweet potato (mashed)
- 1 1/2 cups whole wheat flour (or oat flour for grain-free)
- 1/4 cup rolled oats
Instructions
- Thoroughly wash and peel the sweet potato, then dice into uniform small cubes to ensure even cooking and consistent texture.
- Steam or boil the sweet potato pieces until they become tender and easily mashable, which helps create a smooth base for the dog treats.
- Once cooked, mash the sweet potato completely, removing any lumps, and allow it to cool to room temperature to prevent egg scrambling.
- In a spacious mixing bowl, combine the cooled mashed sweet potato, creamy peanut butter, and egg, blending until the mixture achieves a uniform consistency.
- Gradually incorporate the flour and rolled oats into the wet ingredients, mixing carefully to form a cohesive, slightly sticky dough that holds together well.
- Lightly dust a clean work surface with flour to prevent sticking, then gently roll out the dough to approximately ¼ inch thickness using a rolling pin.
- Select a bone-shaped cookie cutter to create playful treat shapes, pressing firmly and smoothly to cut clean edges for professional-looking dog chews.
- Preheat the oven to 350°F and line a baking sheet with parchment paper to prevent sticking and ensure easy removal of the treats.
- Arrange the cut treats on the prepared baking sheet, leaving small spaces between each chew to promote even baking.
- Bake for 20-25 minutes, watching for a slightly golden exterior and firm texture that indicates complete cooking.
- Remove from the oven and let the chews cool completely on a wire rack, which prevents moisture buildup and ensures a crisp texture.
- Once thoroughly cooled, serve these homemade treats to your furry friend as a nutritious and delicious reward.
Notes
- Swap standard flour with gluten-free alternatives like rice or coconut flour for sensitive pups with wheat allergies.
- Choose unsalted, natural peanut butter without xylitol to ensure dog safety and prevent potential toxicity risks.
- Control treat size based on your dog’s weight, cutting smaller pieces for tiny breeds and larger chunks for big dogs to manage calorie intake.
- Store homemade chews in an airtight container in the refrigerator for up to one week, extending freshness and preventing bacterial growth.
- Prep Time: 20 minutes
- Cook Time: 45 minutes
- Category: Snacks
- Method: Baking
- Cuisine: American
Nutrition
- Serving Size: 10
- Calories: 90
- Sugar: 1g
- Sodium: 20mg
- Fat: 4g
- Saturated Fat: 1g
- Unsaturated Fat: 3g
- Trans Fat: 0g
- Carbohydrates: 12g
- Fiber: 2g
- Protein: 3g
- Cholesterol: 20mg
Marcus Hale
Founder & Recipe Storyteller
Expertise
Education
Holyoke Community College – HCC-MGM Culinary Arts Institute
Marcus grew up surrounded by maple trees, farm stands, and the smell of Sunday stew simmering on the stove. After earning his Culinary Arts Certificate from the HCC-MGM Culinary Arts Institute, he knew he didn’t want to work in fancy kitchens, he wanted to cook for real people.
At Whip Up Cook Up, Marcus is the guy turning memories into meals. His recipes are fast, full of flavor, and built for home cooks who want big taste without the drama.