
Joyful Merry Christmas Sugar Cookies Recipe: A Sweet Festive Delight
Sweet memories sparkle with these merry christmas sugar cookies that dance between childhood nostalgia and festive cheer.
Crisp edges and soft centers promise delightful moments of pure joy.
Grandma’s classic recipe comes alive with simple ingredients and love-filled preparation.
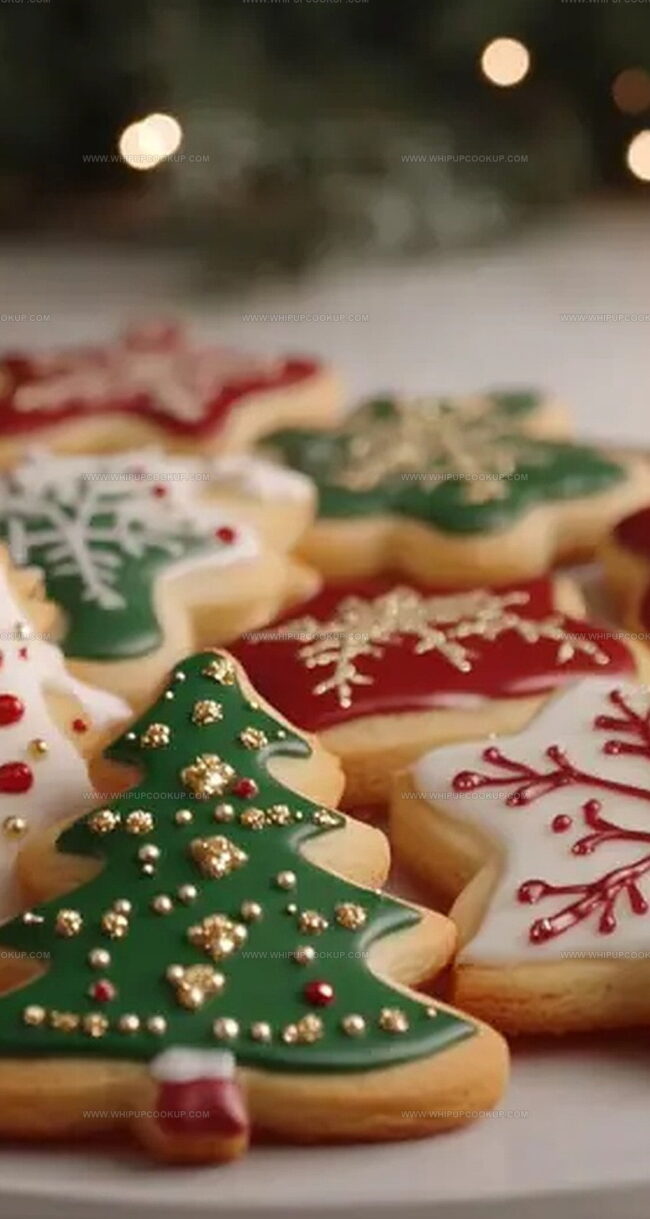
Delicate snowflake shapes and sparkling sugar crystals make each cookie a miniature celebration.
Baking becomes a magical ritual connecting generations through shared warmth and sweetness.
The kitchen fills with comforting aromas that whisper holiday traditions.
You’ll find these treats irresistible and perfect for spreading seasonal happiness.
Sugar Cookies That Spell Out Merry in Every Bite
Craft Holiday Magic: Simple Sugar Cookie Joy
Gingerbread Cake with Eggnog Frosting Ingredients
Cookie Base Ingredients:Flavor Enhancers:Dry Ingredients:Decoration Ingredients:Optional Decorative Touches:Preparation Extras:Baking Merry Christmas Sugar Cookies That All Ages Adore

Step 1: Prepare Cookie Dough
Mix dry ingredients by whisking flour, baking powder, and salt in a medium bowl. In a separate large bowl, cream butter and sugar until they become fluffy and light. Add egg and vanilla, blending thoroughly. Gradually incorporate dry ingredients until a soft dough forms. Divide dough into two portions, wrap in plastic, and refrigerate for 30 minutes.
Step 2: Shape and Bake Cookies
Preheat oven to 350°F. Dust work surface with flour and roll out chilled dough to 1/4 inch thickness. Use festive cookie cutters to create holiday shapes. Transfer cutouts to parchment-lined baking sheets. Bake for 8-10 minutes until edges turn golden. Remove and cool completely on wire racks.
Step 3: Create Royal Icing Magic
In a mixing bowl, combine:Beat mixture on high speed until stiff peaks develop. Adjust consistency by adding water if needed. Separate icing into different bowls and add gel food coloring for vibrant decorations.
Step 4: Decorate with Festive Flair
Pipe thick icing borders around cookie edges. Fill center with thinner icing, using a toothpick to smooth surfaces and remove air bubbles. Enhance cookies with:Step 5: Let Cookies Set
Allow decorated cookies to dry completely for 2-4 hours. Store in single layers or between parchment paper to maintain their beautiful designs.
Sugar Cookie Tips That Make Christmas Extra Merry
Perfect Dough Chill: Refrigerate dough for at least 30 minutes to prevent spreading and maintain crisp cookie shapes during baking.
Flour Dusting Technique: Lightly dust work surface with flour to prevent sticky dough and ensure smooth rolling without toughening cookies.
Royal Icing Consistency: Adjust icing thickness by adding water gradually – thick for borders, thin for flooding – to create professional-looking decorated cookies.
Prevent Overbaking: Watch cookies closely and remove from oven when edges turn light golden to maintain soft, tender texture without becoming hard or dry.
Decorating Pro Tip: Use toothpick to pop air bubbles in flooded icing and create smooth, professional-looking cookie surfaces for stunning holiday treats.
Store Christmas Sugar Cookies Without Losing Shape
Brie and Pear Phyllo Cups Serving Suggestions
Gingerbread Cake with Frosted Layers
FAQs
These sugar cookies are beginner-friendly. With basic baking skills and following the step-by-step instructions, even novice bakers can create beautiful holiday treats.
Yes, you can prepare the cookie dough up to 3 days in advance. Wrap it tightly in plastic wrap and store in the refrigerator. This makes holiday baking more convenient and less stressful.
Lightly dust your work surface and rolling pin with flour. If the dough becomes too soft, return it to the refrigerator for 10-15 minutes to firm up. This prevents sticking and makes rolling easier.
Chill the cut-out cookies for 15 minutes before baking. Use cold dough and ensure your butter is not too soft. These steps help maintain the cookie shapes during baking.
Print
Merry Christmas Sugar Cookies A Holiday Treat For All Ages Recipe
- Total Time: 55 minutes
- Yield: 24 1x
Description
Merry Christmas Sugar Cookies bring festive cheer straight from grandma’s kitchen, spreading joy with each sweet, buttery bite. Delicate snowflake shapes and sparkling sugar crystals invite you to savor holiday magic in one delightful cookie.
Ingredients
Dry Ingredients:
- 2.75 cups (650 ml) all-purpose flour
- 1 teaspoon (5 ml) baking powder
- 0.5 teaspoon (2.5 ml) salt
Wet Ingredients:
- 1 cup (226 grams) unsalted butter, softened
- 1 cup (200 grams) granulated sugar
- 1 large egg
- 1 teaspoon (5 ml) vanilla extract
Optional Flavor Enhancer:
- 1 teaspoon (5 ml) almond extract (optional)
Instructions
- Prepare the foundation for these festive sugar cookies by preheating the oven to 350°F (175°C) and lining baking sheets with parchment paper.
- Combine flour, baking powder, and salt in a medium mixing vessel, creating a uniform dry ingredient blend.
- In a separate large bowl, whip butter and sugar together until the mixture becomes airy and pale, achieving a light, creamy consistency.
- Incorporate egg, vanilla extract, and optional almond extract into the butter mixture, stirring until thoroughly integrated.
- Gradually fold dry ingredients into the wet mixture, gently mixing until a soft, pliable dough emerges.
- Divide the dough into two equal portions, individually wrap in plastic film, and refrigerate for a minimum of 30 minutes to enhance flavor and texture.
- On a lightly dusted surface, roll out the chilled dough to a ¼ inch thickness, using festive cookie cutters to create holiday-themed shapes.
- Carefully transfer cookie shapes onto prepared baking sheets, ensuring even spacing.
- Bake for 8-10 minutes, watching for delicate golden edges as a sign of perfect doneness.
- Allow cookies to cool completely on wire racks before beginning the decorative process.
- Craft royal icing by whisking powdered sugar, egg white (or meringue powder), water, and optional lemon juice in a mixing bowl.
- Beat the mixture at high speed until stiff, glossy peaks form, adjusting liquid content for ideal consistency.
- Separate icing into multiple bowls, introducing gel food coloring to create a vibrant palette.
- Develop two icing textures: a thicker version for intricate borders and a thinner variant for smooth flooding.
- Embellish cookies by piping a precise border with thick icing, then flood the interior with thinned icing.
- Utilize a toothpick to eliminate air bubbles and create smooth surfaces.
- Add whimsical details using additional icing, sparkling edible pearls, and festive sprinkles.
- Optional: Dust cookies with edible glitter for an extra touch of holiday magic.
- Allow decorated cookies to dry completely for 2-4 hours before serving or storing.
Notes
- Chill the dough thoroughly to prevent spreading and maintain crisp cookie shapes during baking.
- Use parchment paper or silicone mats for even baking and easy cookie removal without sticking.
- Dust work surface lightly with powdered sugar instead of flour to prevent dough from becoming dry and tough.
- Test oven temperature with a single cookie first to ensure perfect golden edges without burning.
- Make royal icing consistently smooth by sifting powdered sugar and using room temperature egg whites or meringue powder.
- Switch to gel food coloring for vibrant, concentrated colors that won’t thin out icing consistency.
- Store decorated cookies in single layers between parchment paper to prevent design smudging.
- Freeze unbaked cookie cutouts for quick holiday baking and last-minute entertaining.
- Prep Time: 45 minutes
- Cook Time: 10 minutes
- Category: Desserts, Snacks
- Method: Baking
- Cuisine: American
Nutrition
- Serving Size: 24
- Calories: 150
- Sugar: 10 g
- Sodium: 50 mg
- Fat: 8 g
- Saturated Fat: 5 g
- Unsaturated Fat: 3 g
- Trans Fat: 0 g
- Carbohydrates: 20 g
- Fiber: 0 g
- Protein: 1 g
- Cholesterol: 30 mg
Marcus Hale
Founder & Recipe Storyteller
Expertise
Education
Holyoke Community College – HCC-MGM Culinary Arts Institute
Marcus grew up surrounded by maple trees, farm stands, and the smell of Sunday stew simmering on the stove. After earning his Culinary Arts Certificate from the HCC-MGM Culinary Arts Institute, he knew he didn’t want to work in fancy kitchens, he wanted to cook for real people.
At Whip Up Cook Up, Marcus is the guy turning memories into meals. His recipes are fast, full of flavor, and built for home cooks who want big taste without the drama.