Refreshing No-Bake Lemonade Pie Recipe for Summer Sweetness
Summer’s heat calls for a zesty no-bake lemonade pie that whisks you straight to refreshing bliss.
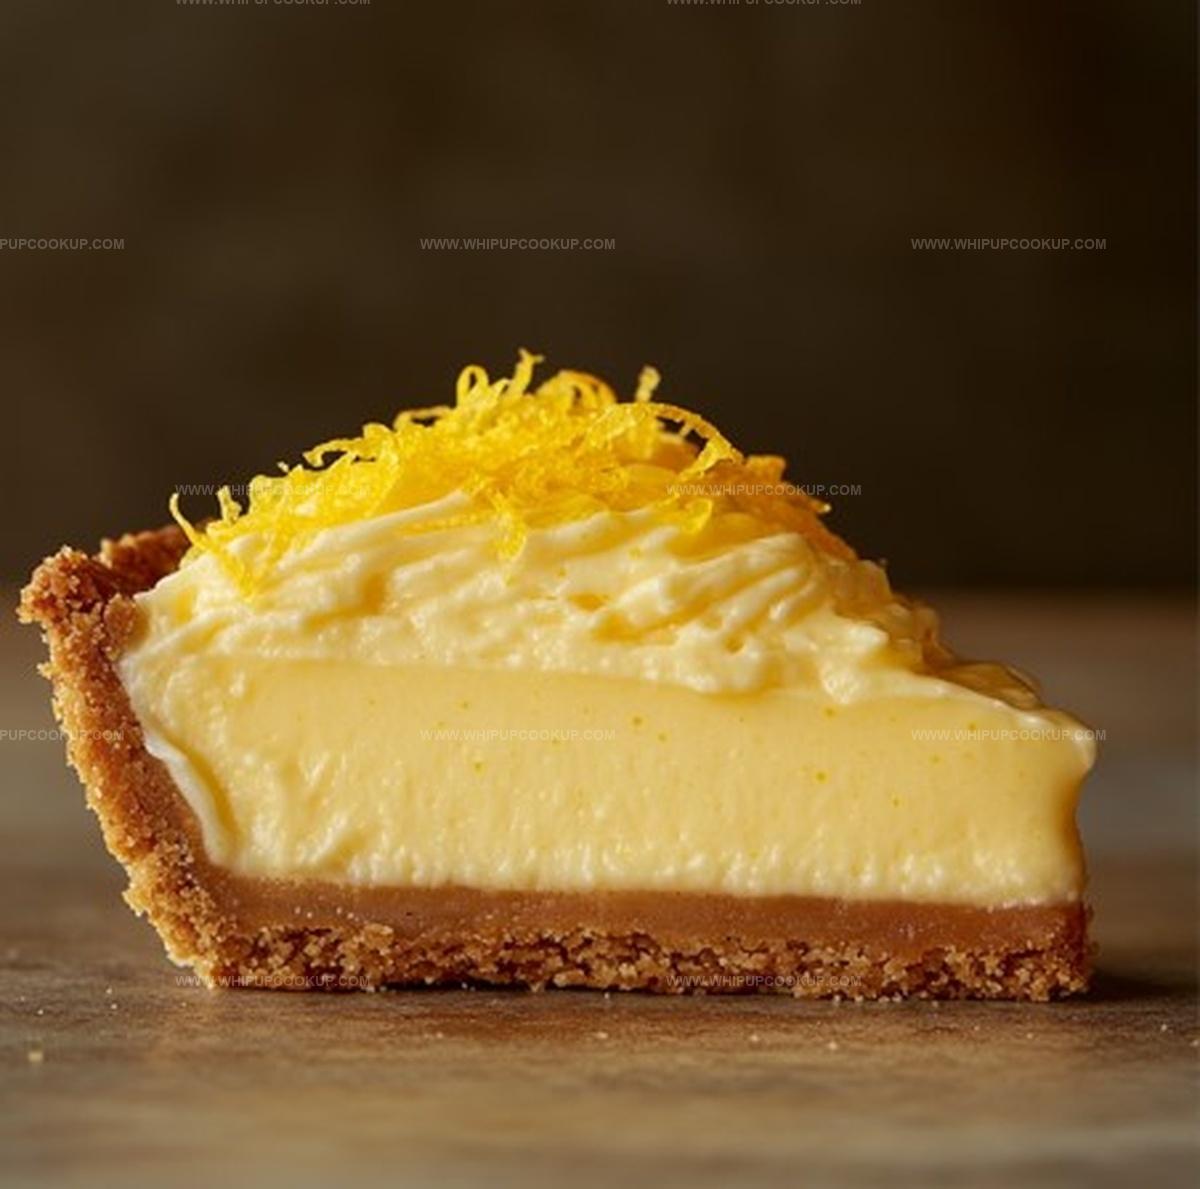
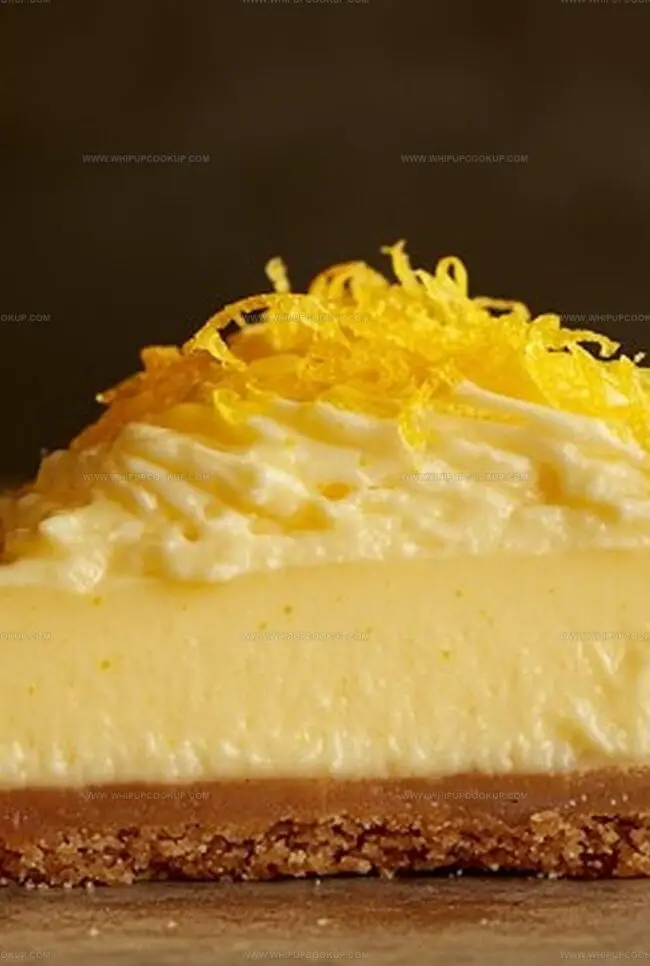
Sweet-tart flavors dance through every creamy bite of this chilled dessert.
Cool graham cracker crusts cradle a silky smooth filling bursting with citrusy brightness.
Whipping up this treat requires minimal effort and zero oven time.
Condensed milk blends perfectly with tangy lemon juice to create a dreamy texture.
Guests will swoon over the bright, sunny notes that make this pie irresistible.
You can assemble this dessert in just minutes, making it the ultimate stress-free crowd-pleaser.
Let’s dive into a recipe that promises to become your new warm-weather obsession.
Why No-Bake Lemonade Pie Is a Summer Favorite
What Goes into No-Bake Lemonade Pie
Pie Base:Creamy Filling Ingredients:Garnish Options:How to Whip Up No-Bake Lemonade Pie

Step 1: Whip Up the Pudding Base
In a spacious mixing bowl, vigorously whisk together the milk and instant vanilla pudding mix.
Beat the ingredients for about two minutes until the mixture transforms into a thick, silky-smooth consistency.
Your goal is to create a creamy foundation that will support the entire pie’s structure.
Step 2: Blast in the Lemonade Flavor
Introduce the thawed lemonade concentrate to your pudding mixture.
Whisk enthusiastically for 1-2 minutes, ensuring the tangy liquid blends completely.
The result should be a bright, zesty mixture that hints at the refreshing pie to come.
Step 3: Fold in the Fluffy Cloud
Gently incorporate the thawed whipped topping using a spatula.
Blend with a light touch, creating a smooth, airy mixture.
The key is to maintain the whipped topping’s delicate volume while achieving a uniform texture.
Step 4: Fill the Crunchy Crust
Transfer the lemonade mixture into the graham cracker crust.
Use a spatula to spread the filling evenly, creating a perfectly smooth surface that promises deliciousness in every bite.
Step 5: Chill and Set
Slide the pie into the refrigerator and let it rest for a minimum of 4 hours.
This crucial waiting period allows the pie to set completely, transforming from a loose mixture to a sliceable dessert.
Step 6: Optional Freeze Twist
For those craving an extra-cool treat, pop the pie into the freezer for 2-3 hours.
This transforms the dessert into a quasi-ice cream experience that will make taste buds dance.
Step 7: Dress to Impress
Before serving, add a final flourish.
Scatter fresh lemon slices, sprinkle candied lemon peel, or dust with citrus zest.
These finishing touches elevate your no-bake wonder from delicious to absolutely spectacular.
Tips for the Creamiest Lemonade Pie
How to Chill and Store Lemonade Pie
What to Serve with Lemonade Pie
Flavor Ideas for Lemonade Pie Lovers
FAQs
The pie uses instant vanilla pudding mix, thawed lemonade concentrate, whipped topping, and a graham cracker crust to create a creamy, tangy dessert without baking.
Not at all! This pie is incredibly simple and requires no baking. You just mix ingredients, pour into a crust, and let it chill in the refrigerator.
No, the recipe specifically calls for thawed lemonade concentrate to achieve the right consistency and flavor intensity. Fresh lemonade might make the filling too watery.
When stored in the refrigerator, the pie will remain fresh for 3-4 days. Keep it covered to prevent it from absorbing other refrigerator odors and to maintain its texture.
Print
No-Bake Lemonade Pie Recipe
- Total Time: 15 minutes
- Yield: 8 1x
Description
Summer’s sweetest secret, no-bake lemonade pie, delivers zesty refreshment with minimal kitchen effort. Creamy citrus filling nestled in a graham cracker crust promises cool comfort you’ll savor with each delightful bite.
Ingredients
Main Ingredients:
- 1.75 cups (414 ml) milk
- 2 (3.4 ounces / 96 grams) packages instant vanilla pudding mix
- 1 (6 ounces / 170 grams) can frozen lemonade concentrate, thawed
- 1 (8 ounces / 227 grams) container frozen whipped topping, thawed
Crust:
- 1 graham cracker pie crust
Garnish (Optional):
- Lemon slices
- Candied lemon peel
- Lemon zest
Instructions
- Prepare a smooth, creamy foundation by whisking milk with instant vanilla pudding mix for 2 minutes until the mixture becomes thick and uniform, creating a rich base for the pie.
- Introduce the lemonade concentrate into the pudding mixture, thoroughly blending for 1-2 minutes to ensure an even distribution of the tangy citrus flavor throughout the filling.
- Delicately incorporate the thawed whipped topping using a spatula, gently folding until the mixture achieves a consistent, airy texture without deflating the whipped cream.
- Transfer the lemonade pie filling into the prepared graham cracker crust, carefully spreading it into a level surface using a spatula to create an even, attractive layer.
- Refrigerate the pie for a minimum of 4 hours, allowing the filling to completely set and develop a firm, sliceable consistency that holds its shape when cut.
- For an alternative serving option, place the pie in the freezer for 2-3 hours to create a more solid, gelato-like texture that offers a refreshing twist on the classic recipe.
- Before presenting, enhance the pie’s visual appeal and flavor profile by adorning it with delicate lemon slices, zesty candied peel, or a light sprinkle of citrus zest that complements the pie’s bright, tangy essence.
Notes
- Creamy Consistency Matters: Whisk the pudding mixture thoroughly to achieve a smooth, thick base that prevents a runny pie texture.
- Lemonade Balance: Use fresh or concentrate carefully, adjusting sweetness by tasting before mixing to ensure a perfect tangy-sweet profile.
- Folding Technique: Use gentle, circular motions when incorporating whipped topping to maintain its light, airy structure and prevent deflation.
- Freezer Flexibility: Experiment with chilling times – 4 hours in the refrigerator or 2-3 hours in the freezer creates different texture experiences.
- Prep Time: 15 minutes
- Cook Time: 0 minutes
- Category: Desserts
- Method: Chilling
- Cuisine: American
Nutrition
- Serving Size: 8
- Calories: 260
- Sugar: 22 g
- Sodium: 150 mg
- Fat: 10 g
- Saturated Fat: 5 g
- Unsaturated Fat: 4 g
- Trans Fat: 0 g
- Carbohydrates: 38 g
- Fiber: 0 g
- Protein: 3 g
- Cholesterol: 15 mg
Marcus Hale
Founder & Recipe Storyteller
Expertise
Education
Holyoke Community College – HCC-MGM Culinary Arts Institute
Marcus grew up surrounded by maple trees, farm stands, and the smell of Sunday stew simmering on the stove. After earning his Culinary Arts Certificate from the HCC-MGM Culinary Arts Institute, he knew he didn’t want to work in fancy kitchens, he wanted to cook for real people.
At Whip Up Cook Up, Marcus is the guy turning memories into meals. His recipes are fast, full of flavor, and built for home cooks who want big taste without the drama.