Easy Homemade Pumpkin Oreo Balls Recipe – Cozy Fall Treat
Creamy pumpkin oreo balls deliver an irresistible autumn dessert that brings sweet magic to your table.
Crushed cookies blend with rich cream cheese and seasonal spices for a perfectly balanced treat.
Smooth pumpkin flavors dance with chocolatey oreo crumbs in each delightful bite.
Chilled and compact, these no-bake delights promise maximum flavor with minimal effort.
Seasonal gatherings demand something special, and these bite-sized morsels will spark conversation and delight.
Whip up a batch and watch smiles spread faster than falling autumn leaves.
You’ll become the dessert hero everyone celebrates.
FAQs
You can substitute white chocolate or milk chocolate, but candy melts provide the best coating and color for these pumpkin Oreo balls.
When stored in an airtight container in the refrigerator, these pumpkin Oreo balls will keep well for up to 5-7 days.
Absolutely! Kids can help crush the Oreos, mix the ingredients, and roll the balls. Adult supervision is needed for melting candy and dipping.
Regular or Halloween-themed Oreo cookies work perfectly. For extra pumpkin flavor, you could use pumpkin spice Oreos if available.
What Makes Pumpkin Oreo Balls a Holiday Staple
Pumpkin Oreo Balls Ingredient Guide
Cookies and Crumbs Base:Binding Ingredient:Coating and Decoration:Pumpkin Oreo Balls Recipe Guide
Step 1: Crush Oreo Cookies
Grab your food processor and pulse the Oreo cookies until they transform into fine, sandy crumbs. Break them down completely for a smooth texture that will make your pumpkin balls irresistible.
Step 2: Create Creamy Mixture
In a large mixing bowl, combine the Oreo crumbs with softened cream cheese. Stir and mix until the ingredients blend into a uniform, velvety consistency that holds together perfectly.
Step 3: Shape Adorable Balls
Use your hands or a small scoop to form the mixture into bite-sized spheres. Gently roll each portion into a perfect round shape, placing them on a parchment-lined baking sheet. Pop the tray into the refrigerator for a quick 15-minute chill to firm up the balls.
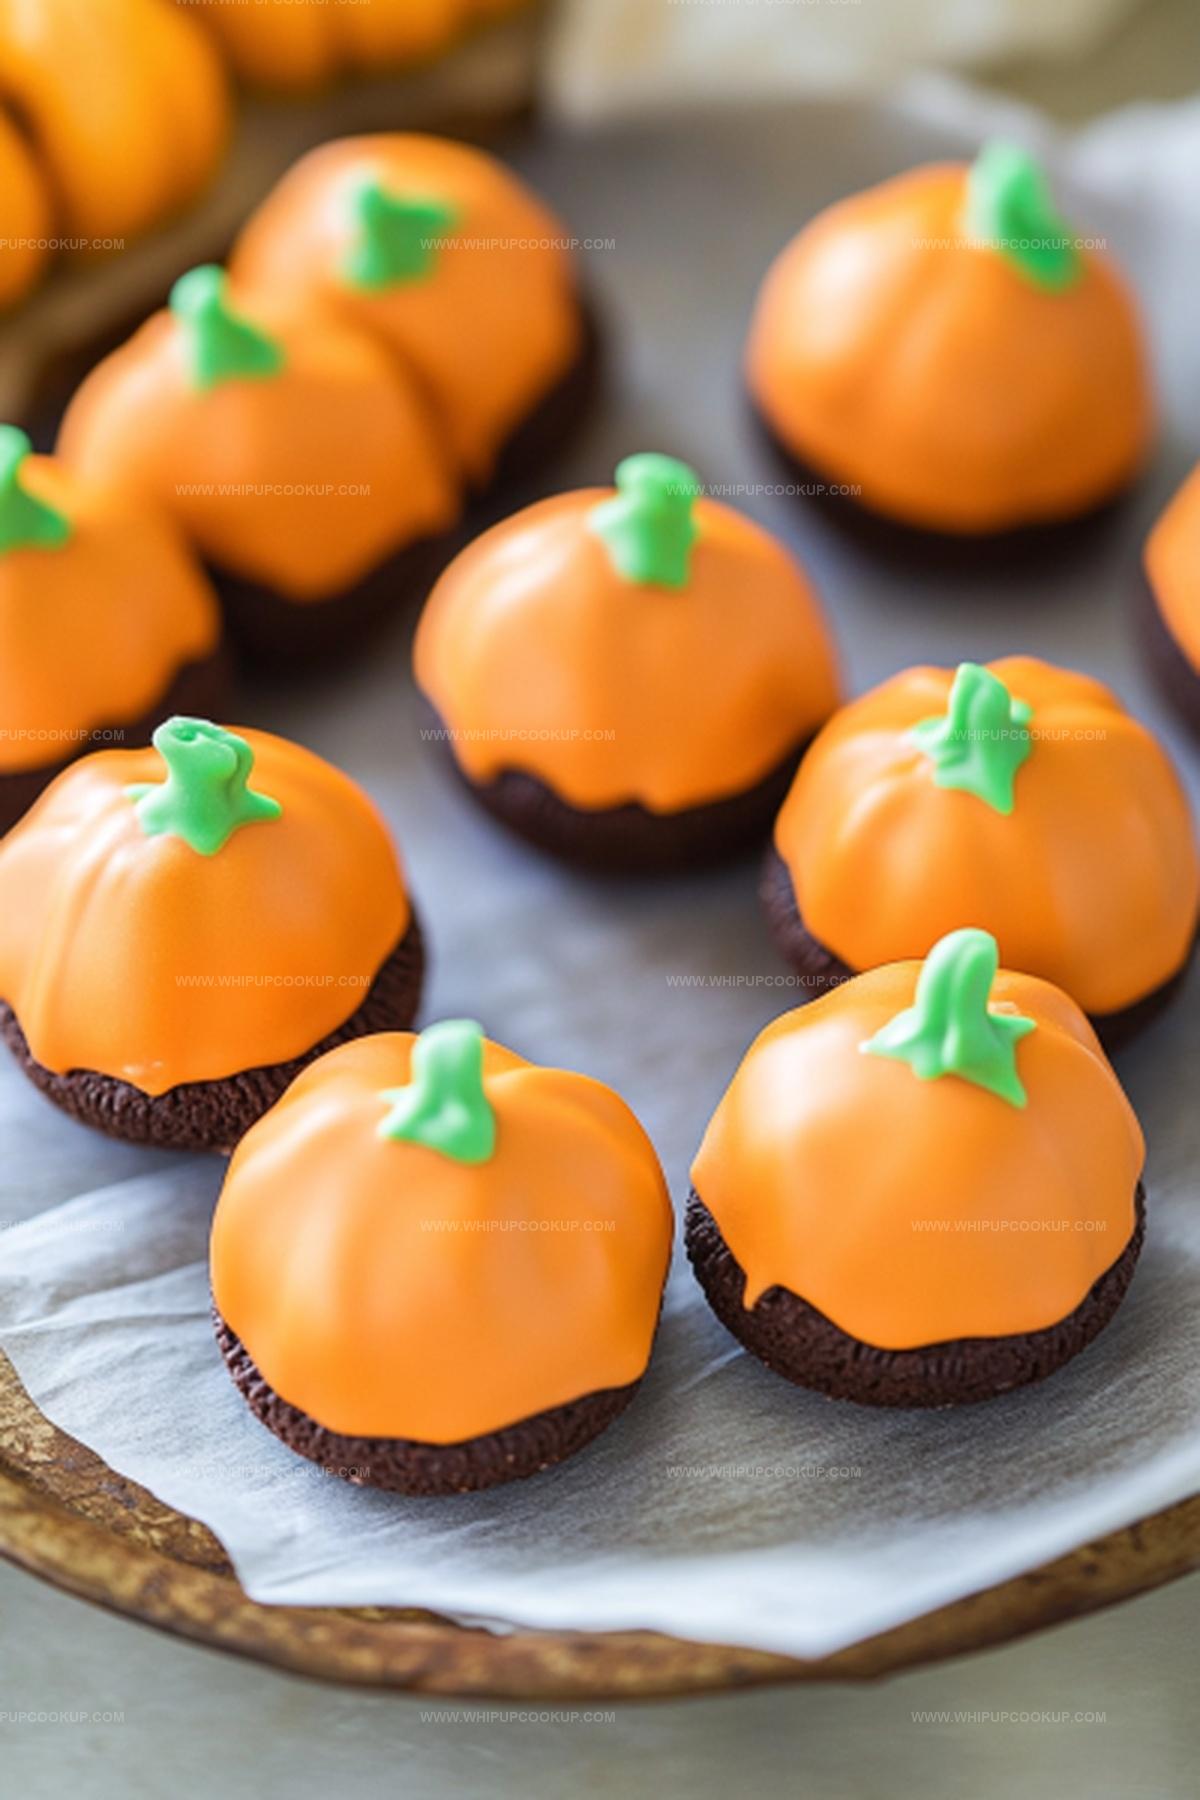
Step 4: Carve Pumpkin Details
Take a toothpick and carefully score delicate lines across each ball, mimicking the natural ridges of a pumpkin. Return the tray to the refrigerator for another 10 minutes to set the details.
Step 5: Prepare Candy Coating
Melt orange candy wafers using either the microwave or a double boiler. Stir gently and ensure a smooth, glossy finish for your coating.
Step 6: Dunk and Decorate
Carefully dip each chilled ball into the melted orange candy. Gently shake off excess coating and place back on the parchment. While the coating is still wet:Step 7: Final Chill and Serve
Refrigerate the decorated Oreo balls until the candy coating sets completely. Serve these adorable treats cold and watch everyone’s eyes light up with delight!
Oreo Ball Tricks for No-Bake Pumpkin Joy
Proper Storage For Pumpkin Oreo Balls
Sweet Complements for Pumpkin Oreo Balls
Pair Creamy Pumpkin Oreo Balls with Complementary Flavors
Pumpkin Oreo Ball Takes
Print
Pumpkin Oreo Balls Recipe
- Total Time: 25 minutes
- Yield: 12 1x
Description
Irresistible pumpkin oreo balls bring autumn’s warmth to classic dessert lovers, combining creamy pumpkin spice with chocolate cookie crunch. Chilled and rolled in white chocolate, these bite-sized treats promise pure seasonal indulgence you can enjoy with friends.
Ingredients
Pumpkin Pies
- 36 Oreo cookies
- 8 ounces (226 grams) cream cheese, softened
Coating
- 12 ounces (340 grams) orange candy melts
Garnish
- Small pretzel sticks
- Green leaf icing decorations
Instructions
- Pulverize Oreo cookies into fine, uniform crumbs using a food processor, ensuring no large chunks remain.
- Transfer cookie crumbs to a mixing bowl and incorporate softened cream cheese, blending until the mixture achieves a consistent, smooth texture without any visible cream cheese streaks.
- Carefully form the mixture into compact, uniform spheres approximately one inch in diameter, positioning each ball onto a parchment-lined baking sheet with precise spacing.
- Chill the formed balls in the refrigerator for 15 minutes to firm up their structure and make them easier to handle.
- Utilizing a toothpick, delicately etch vertical lines around each chilled ball to mimic a pumpkin’s natural segmentation, creating a realistic textural appearance.
- Return the scored balls to the refrigerator for an additional 10 minutes to solidify the surface and maintain their shape during coating.
- Gently melt orange candy wafers using a microwave or double boiler method, stirring periodically to achieve a smooth, uniform consistency without overheating.
- Carefully submerge each chilled ball into the melted orange coating, allowing excess to drip off, then place back onto the parchment-lined sheet.
- While the coating is still wet, insert a small pretzel stick at the top to represent the pumpkin stem and pipe a delicate green icing leaf for additional decorative detail.
- Refrigerate the decorated balls until the candy coating completely sets and hardens, creating a glossy, professional finish.
Notes
- Crush Oreos thoroughly to ensure a smooth, uniform texture that helps bind the mixture perfectly.
- Use room temperature cream cheese for easier mixing and a creamier consistency without lumps.
- Chill balls before scoring to maintain their shape and make creating pumpkin lines easier.
- Melt candy wafers slowly and carefully to prevent burning or seizing, which can ruin the coating.
- Keep hands slightly damp when rolling balls to prevent sticky mixture from clinging to fingers.
- Drain excess candy coating by gently tapping the dipped ball on the bowl’s edge for a clean, professional finish.
- Store in refrigerator for up to 5 days in an airtight container to maintain freshness and texture.
- Experiment with different Oreo flavors like golden or chocolate for unique taste variations.
- Prep Time: 25 minutes
- Cook Time: 0 minutes
- Category: Desserts, Snacks
- Method: Rolling
- Cuisine: American
Nutrition
- Serving Size: 12
- Calories: 150
- Sugar: 12g
- Sodium: 100mg
- Fat: 7g
- Saturated Fat: 4g
- Unsaturated Fat: 2g
- Trans Fat: 0g
- Carbohydrates: 19g
- Fiber: 1g
- Protein: 2g
- Cholesterol: 15mg
Marcus Hale
Founder & Recipe Storyteller
Expertise
Education
Holyoke Community College – HCC-MGM Culinary Arts Institute
Marcus grew up surrounded by maple trees, farm stands, and the smell of Sunday stew simmering on the stove. After earning his Culinary Arts Certificate from the HCC-MGM Culinary Arts Institute, he knew he didn’t want to work in fancy kitchens, he wanted to cook for real people.
At Whip Up Cook Up, Marcus is the guy turning memories into meals. His recipes are fast, full of flavor, and built for home cooks who want big taste without the drama.