
Fluffy Pumpkin Snickerdoodle Scones Recipe: Fall’s Coziest Treat
Autumn whispers through a cozy kitchen where pumpkin snickerdoodle scones promise pure comfort and warmth.
Crisp mornings call for something special that blends seasonal spices with sweet nostalgia.
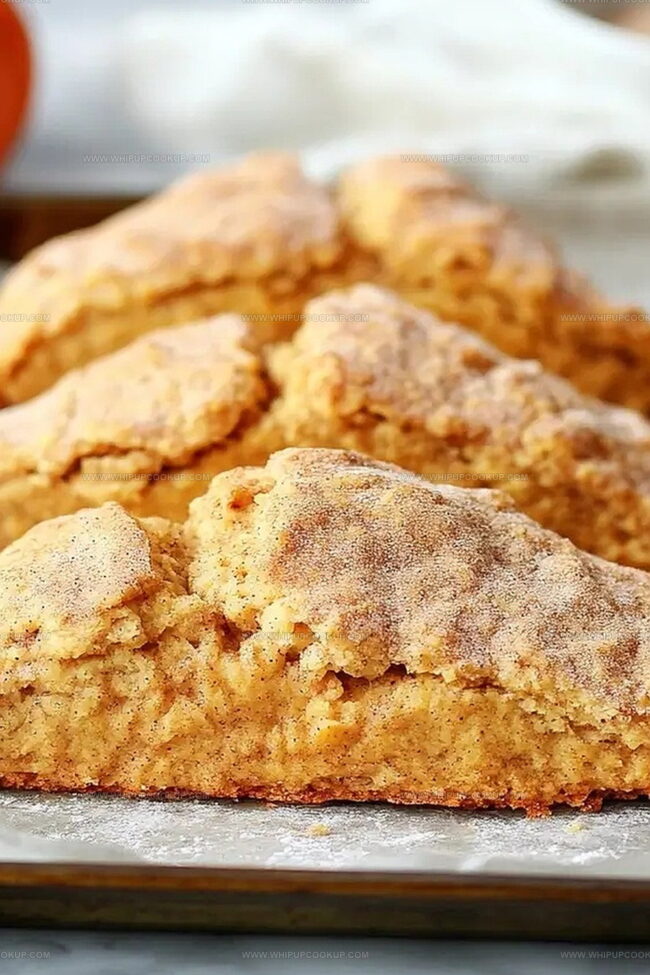
Soft, buttery dough mingles cinnamon and nutmeg into delightful little triangles of joy.
Baking these treats feels like wrapping yourself in a soft blanket of deliciousness.
Crumbling with tender layers, each scone brings memories of childhood bakery visits.
Sprinkled with crunchy cinnamon sugar, they’re guaranteed to make your morning magical.
Scones That Blend Pumpkin with a Cinnamon Sugar Crust
Pumpkin Snickerdoodle Scones Ingredient List
Base Ingredients:Spices and Seasonings:Fat and Flavor Enhancers:Baking Pumpkin Snickerdoodle Scones with Fall Spice

Step 1: Warm up the Oven
Crank your oven to a toasty 400°F and line a baking sheet with parchment paper so nothing sticks.
Step 2: Create Dry Powder Base
Grab a big mixing bowl and whisk together:Blend these dry ingredients until they’re perfectly combined.
Step 3: Crumble the Butter
Toss cold butter cubes into the flour mixture. Use a pastry cutter or your fingertips to break down the butter until the mixture looks like rough breadcrumbs.
Step 4: Mix Moisture Magic
In a separate bowl, whisk together:Pour this wet mixture into the dry ingredients and stir gently until everything just comes together.
Step 5: Shape Delightful Wedges
Dust your countertop with flour and spread out the dough. Pat it into a circular shape about an inch thick. Slice the circle into 8 beautiful wedges and transfer them to your prepared baking sheet.
Step 6: Sprinkle Cinnamon Sugar Love
Combine sugar and cinnamon in a small bowl. Generously dust each scone with this sweet, spicy mixture.
Step 7: Bake to Golden Perfection
Slide the baking sheet into the preheated oven. Bake for 15-18 minutes until the scones turn a gorgeous golden brown. Let them rest on the sheet for a few minutes before serving warm.
Scone Tips for Perfect Pumpkin Snickerdoodle Layers
Store Pumpkin Snickerdoodle Scones Without Losing Softness
Snickerdoodle Pumpkin Scones Serving Picks
Pumpkin Snickerdoodle Scone Mixes
FAQs
These scones combine the warmth of pumpkin with the classic snickerdoodle cinnamon-sugar coating, creating a unique fall-inspired pastry that blends two beloved treats into one delicious recipe.
Not at all! These scones are beginner-friendly. The recipe requires basic mixing techniques and simple ingredients that are easy to work with, making it perfect for home bakers of all skill levels.
Yes, you can! After cutting the dough into wedges, place them on a baking sheet and freeze. Once frozen, transfer to a freezer bag. When ready to bake, place frozen scones directly in the preheated oven and add 2-3 extra minutes to the baking time.
No worries! You can substitute ground nutmeg from a jar, which works perfectly fine in this recipe. The pre-ground version will still provide that warm, aromatic flavor to your scones.
Print
Pumpkin Snickerdoodle Scones Recipe
- Total Time: 40 minutes
- Yield: 12 1x
Description
Pumpkin snickerdoodle scones blend autumn’s warmth with classic cookie charm, creating a delightful breakfast pastry. Cinnamon-sugar coating and tender crumb invite sweet memories of seasonal comfort and homemade indulgence you’ll savor with each bite.
Ingredients
Main Ingredients:
- 2 cups (480 ml) all-purpose flour
- 3/4 cup (180 ml) pumpkin puree
- 1/2 cup (120 ml) cold butter, cubed
- 1 large egg
Dry Ingredients:
- 1/2 cup (120 ml) granulated sugar
- 1 tablespoon baking powder
- 1/2 teaspoon salt
- 1 teaspoon cinnamon
- 1/2 teaspoon nutmeg
Topping:
- 1/4 cup (60 ml) sugar
- 1 teaspoon cinnamon
- 1 teaspoon vanilla extract
Instructions
- Prepare the oven environment by setting the temperature to 400°F (200°C) and lining a baking sheet with parchment paper for optimal scone baking.
- Create a dry ingredient foundation by thoroughly combining flour, sugar, baking powder, salt, ground cinnamon, and nutmeg in a spacious mixing bowl using a whisk.
- Integrate cold butter into the flour mixture, using a pastry cutter or fingertips to break down the butter until the texture resembles coarse, sandy crumbs.
- Craft a wet ingredient blend by whisking pumpkin purée, egg, and vanilla extract until smooth and well-incorporated.
- Merge the wet and dry ingredients, gently folding until just combined to prevent overmixing and maintain a tender scone texture.
- Transfer the dough onto a lightly floured surface, carefully shaping it into a circular disk approximately 1-inch thick.
- Divide the circular dough into eight equal wedges, ensuring precise and uniform cutting for consistent baking.
- Arrange the scone wedges on the prepared baking sheet, leaving slight separation between each piece.
- Prepare a fragrant topping by mixing granulated sugar and ground cinnamon, then generously sprinkle over each scone surface.
- Place the scones in the preheated oven and bake for 15-18 minutes, watching for a golden-brown coloration and firm edges.
- Remove from the oven and allow the scones to rest on the baking sheet for a few minutes, enabling them to set and cool slightly before serving.
Notes
- Use extremely cold butter for the flakiest, most tender scone texture that practically melts in your mouth.
- Handle the dough minimally to prevent developing gluten, which would make scones tough and dense instead of light and crumbly.
- Dust the cutting surface with flour to prevent sticky dough from clinging and ensure clean, sharp scone edges.
- If you’re dairy-free, substitute cold coconut oil or vegan butter for traditional butter without compromising the rich, buttery flavor profile.
- Prep Time: 20 minutes
- Cook Time: 20 minutes
- Category: Breakfast, Snacks, Desserts
- Method: Baking
- Cuisine: American
Nutrition
- Serving Size: 12
- Calories: 180
- Sugar: 6 g
- Sodium: 150 mg
- Fat: 7 g
- Saturated Fat: 4 g
- Unsaturated Fat: 3 g
- Trans Fat: 0 g
- Carbohydrates: 26 g
- Fiber: 1 g
- Protein: 3 g
- Cholesterol: 25 mg
Marcus Hale
Founder & Recipe Storyteller
Expertise
Education
Holyoke Community College – HCC-MGM Culinary Arts Institute
Marcus grew up surrounded by maple trees, farm stands, and the smell of Sunday stew simmering on the stove. After earning his Culinary Arts Certificate from the HCC-MGM Culinary Arts Institute, he knew he didn’t want to work in fancy kitchens, he wanted to cook for real people.
At Whip Up Cook Up, Marcus is the guy turning memories into meals. His recipes are fast, full of flavor, and built for home cooks who want big taste without the drama.