
Homemade Pup-Approved Peanut Butter Pizza For Dogs Recipe
Whipping up a delectable peanut butter pizza that dogs absolutely adore can turn an ordinary afternoon into a tail-wagging celebration.
Canine companions go crazy for this creative culinary treat that combines protein-packed ingredients with playful presentation.
Nutritious and simple, this recipe brings joy to four-legged friends with every delicious bite.
Pups will dance around the kitchen, their excitement palpable as you assemble this special meal.
Veterinarian-recommended ingredients ensure a healthy snack that satisfies even the pickiest furry friend.
Watching your dog devour this homemade pizza might just become your new favorite mealtime memory.
Let’s make some canine cuisine that’ll have tails wagging with pure delight!
Dog Pizza Made with Peanut Butter That’s Totally Pup-Approved
Pup-Approved Peanut Butter Pizza Ingredients
Core Ingredients:Topping Ingredients:Baking Essentials:Peanut Butter Pizza for Dogs Making It Pup Friendly
Step 1: Prepare Baking Station
Get your oven ready by warming it to 350°F. Cover a baking sheet with parchment paper to prevent sticking.
Step 2: Blend Dough Ingredients
In a mixing bowl, combine ingredients to create a smooth, workable dough:Mix thoroughly until the ingredients bind together into a cohesive mixture.
Step 3: Shape Doggy Pizza Crust
Dust a clean surface with flour. Roll out the dough into a circular shape resembling a pizza. Carefully transfer the shaped crust onto the prepared baking sheet.
Step 4: Initial Baking Cycle
Slide the baking sheet into the preheated oven. Bake the crust for 10-12 minutes until it turns firm and develops a light golden color.
Step 5: Add Puppy-Friendly Toppings
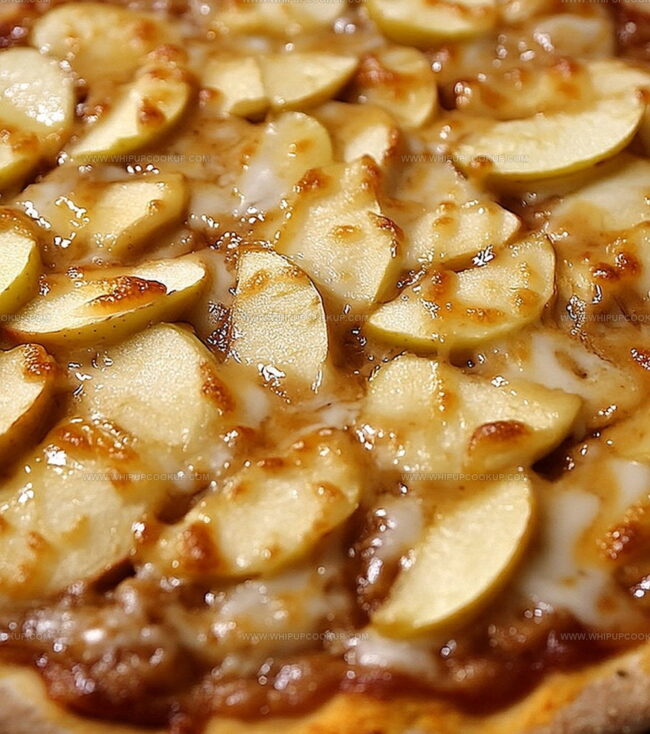
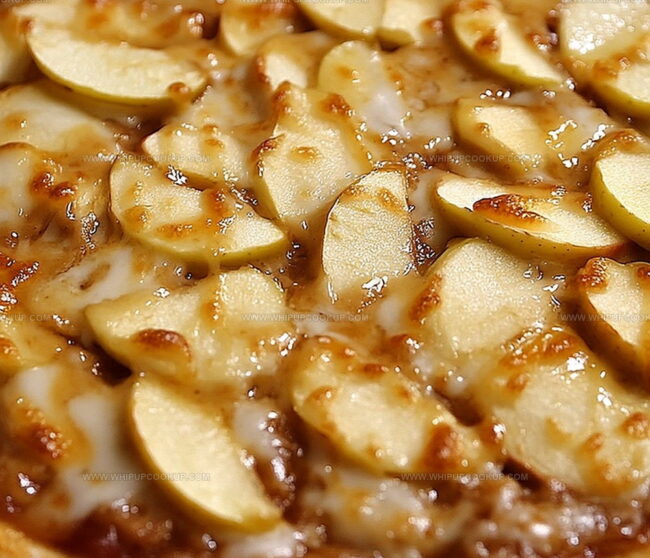
Allow the crust to cool slightly. Spread a thin, even layer of peanut butter across the surface. Sprinkle dog-safe cheese over the top.
Step 6: Final Melting Stage
Return the pizza to the oven for 5-7 minutes. Watch as the cheese becomes melted and gooey.
Step 7: Cool and Serve
Let the pizza cool completely. Top with fresh apple slices, then cut into bite-sized pieces perfect for your furry friend.
Dog Pizza Tips with Peanut Butter Twist
Save and Serve Pup-Approved Peanut Butter Pizza for Dogs
Peanut Butter Dog Pizza Recipe Twists
FAQs
Yes, it uses dog-friendly ingredients like whole wheat flour, natural peanut butter without xylitol, egg, and cheese. Always consult your vet before introducing new foods to your dog’s diet.
You can replace whole wheat flour with oat flour or brown rice flour. Use low-fat cheese options like mozzarella. Ensure peanut butter is unsalted and free from artificial sweeteners.
Feed in moderation as a special treat. Small dogs can have 1-2 small pieces, while larger dogs might enjoy 3-4 pieces. Treats should not exceed 10% of daily calorie intake.
The recipe offers protein from egg and peanut butter, calcium from cheese, and fiber from whole wheat flour. Apples provide additional vitamins and help support your dog’s immune system.
Print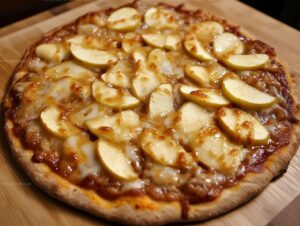
Pup-Approved Peanut Butter Pizza For Dogs Recipe
- Total Time: 45 minutes
- Yield: 4 1x
Description
Canine companions will bark with joy over this peanut butter pizza for dogs, a tail-wagging treat that blends playful creativity with nutritious ingredients. Pups deserve special meals, and this recipe delivers pure doggy delight with wholesome, protein-packed goodness you can trust.
Ingredients
Main Protein:
- 1/4 cup natural peanut butter (xylitol-free)
- 1/2 cup dog-safe cheese (mozzarella)
- 1 egg
Flour Base:
- 1 cup whole wheat flour
Liquid and Topping:
- 1/4 cup water (adjust as needed)
- Apple slices for topping
Instructions
- Warm the oven to a moderate temperature and prepare a baking surface with protective parchment paper for easy cleanup.
- In a spacious mixing vessel, thoroughly blend the core ingredients until a cohesive dough materializes, ensuring no dry patches remain.
- Gently manipulate the dough on a lightly dusted work surface, transforming it into a circular pizza-like shape with smooth, even edges.
- Carefully transfer the shaped dough onto the prepared baking sheet, maintaining its structural integrity.
- Allow the crust to transform in the heated oven, developing a delicate golden hue and achieving a firm, stable texture.
- Remove the crust and let it rest momentarily to cool and stabilize its structure.
- Delicately spread a thin, uniform layer of creamy peanut butter across the surface, creating a smooth base.
- Sprinkle a moderate amount of cheese over the peanut butter layer, ensuring even distribution.
- Return the pizza to the oven for a brief period, allowing the cheese to melt and integrate with the peanut butter base.
- Extract from the oven and permit complete cooling to room temperature.
- Artfully arrange crisp apple slices atop the cooled pizza surface.
- Slice the creation into manageable, bite-sized portions suitable for canine consumption.
Notes
- Customize dough thickness based on your dog’s size and chewing preferences for easier consumption.
- Ensure peanut butter contains no xylitol, which is toxic to dogs, by carefully checking ingredient labels.
- Use low-fat cheese options to maintain healthy calorie intake for dogs with weight management needs.
- Consider replacing cheese with dog-safe yogurt for lactose-intolerant pups or to add probiotic benefits.
- Prep Time: 15 minutes
- Cook Time: 30 minutes
- Category: Recipes for Dogs
- Method: Baking
- Cuisine: American
Nutrition
- Serving Size: 4
- Calories: 190
- Sugar: 1g
- Sodium: 120mg
- Fat: 10g
- Saturated Fat: 3g
- Unsaturated Fat: 7g
- Trans Fat: 0g
- Carbohydrates: 18g
- Fiber: 2g
- Protein: 8g
- Cholesterol: 35mg
Marcus Hale
Founder & Recipe Storyteller
Expertise
Education
Holyoke Community College – HCC-MGM Culinary Arts Institute
Marcus grew up surrounded by maple trees, farm stands, and the smell of Sunday stew simmering on the stove. After earning his Culinary Arts Certificate from the HCC-MGM Culinary Arts Institute, he knew he didn’t want to work in fancy kitchens, he wanted to cook for real people.
At Whip Up Cook Up, Marcus is the guy turning memories into meals. His recipes are fast, full of flavor, and built for home cooks who want big taste without the drama.