
Perfect Red Velvet Christmas Cake Recipe for Holiday Magic
Mixing red velvet magic creates a festive dessert that sparkles with holiday cheer.
Whispers of cocoa and cream cheese frosting dance through this classic treat.
Winter celebrations become extraordinary with each slice of this magnificent confection.
Soft, velvety layers promise delightful moments of pure indulgence.
Generations of bakers have treasured this beloved recipe, passing down sweet traditions.
Crisp decorations and rich colors make you dream of cozy gatherings.
Bake this showstopping dessert and watch faces light up with pure joy.
Red Velvet Cake That’s Dressed for Christmas
Whip Up Holiday Magic: Festive Cake Delight
Gingerbread Loaf Cake with Buttercream Frosting Ingredients
Cake Base Ingredients:Wet Ingredients:Cream Frosting Ingredients:Decoration Ingredients:Red Velvet Christmas Cake Baking Guide
Step 1: Prepare Cake Batter
Grab a mixing bowl and combine your dry ingredients:In a separate bowl, blend your wet ingredients:Mix wet and dry ingredients until smooth and vibrant red. Pour batter into a greased cake pan.
Step 2: Bake The Cake
Slide the pan into a preheated oven at 350°F. Bake for 25-30 minutes until a toothpick comes out clean. Let the cake cool completely.
Step 3: Create Luscious Cream Filling
Chill a mixing bowl in the freezer for 15 minutes. Whip together:Whip until stiff peaks form, being careful not to overbeat.
Step 4: Assemble The Cake
Slice cake horizontally into layers. Place first layer on serving plate. Spread cream filling between each layer. Frost the entire cake with remaining cream.
Step 5: Decorate With Festive Touches
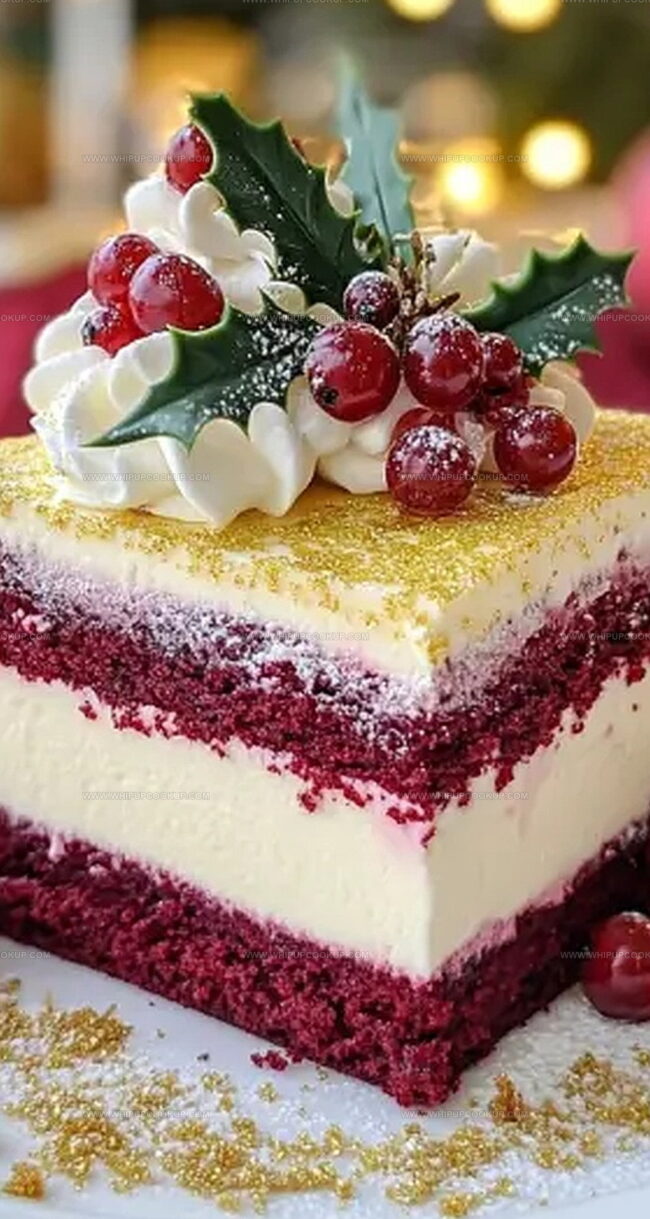
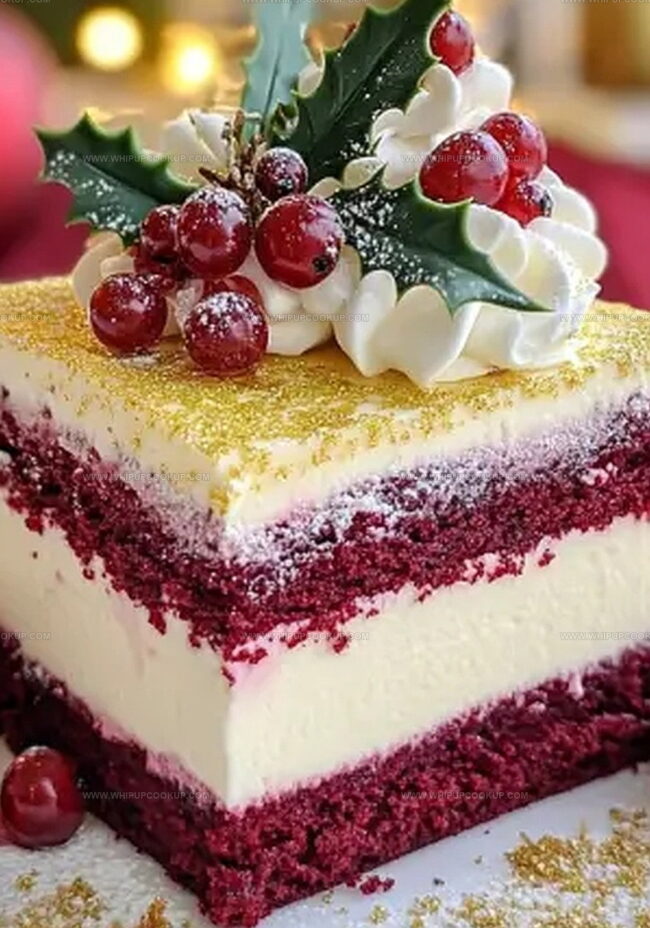
Garnish with:Dust with powdered sugar for a snowy effect.
Step 6: Chill And Serve
Refrigerate cake for 1-2 hours to set. Slice and serve to delighted guests!
Cake Tips That Make Red Velvet Shine at Christmas
Storing Red Velvet Christmas Cake For Later
Fig and Pomegranate Wreath Salad Tips
Festive Flavor Companions: Pairing Suggestions for Red Velvet Christmas Cake
Gingerbread Loaf with Frosted Top
FAQs
Vinegar helps activate the baking soda, creating a tender and light cake texture while enhancing the cake’s signature reddish color.
Yes, you can substitute buttermilk by mixing 1 tablespoon of white vinegar or lemon juice with 1 cup of regular milk and letting it sit for 5 minutes before using.
Use gel food coloring instead of liquid, and avoid overbaking. Check the cake a few minutes before the recommended baking time to maintain its vibrant red color.
Red velvet cake has a subtle cocoa flavor with a distinctive tangy taste from buttermilk and vinegar, and it uses less cocoa powder compared to traditional chocolate cake.
Print
Red Velvet Christmas Cake Recipe
- Total Time: 1 hour 15 minutes
- Yield: 12 1x
Description
Festive red velvet Christmas cake brings holiday magic to dessert tables with rich crimson layers and creamy frosting. Elegant yet simple, this sweet centerpiece promises delightful celebration and joyful memories you’ll treasure.
Ingredients
Main Dry Ingredients:
- 1 1/2 cups (180 grams) all-purpose flour
- 1/2 cup (50 grams) unsweetened cocoa powder
- 1 teaspoon baking powder
- 1/2 teaspoon baking soda
- 1/2 teaspoon salt
Wet Ingredients:
- 1 large egg
- 1 cup (240 milliliters) buttermilk
- 1/2 cup (120 milliliters) vegetable oil
- 2 tablespoons red food coloring (gel preferred)
- 1 teaspoon vanilla extract
- 1 teaspoon white vinegar
Sweeteners:
- 1 cup (200 grams) granulated sugar
Instructions
- Prepare the oven by heating to 350°F and coating an 8×8-inch cake pan with grease and flour. Sift together flour, sugar, cocoa powder, baking powder, baking soda, and salt in a mixing bowl.
- Whisk egg, buttermilk, vegetable oil, red food coloring, vanilla extract, and vinegar in a separate container. Fold wet ingredients into dry ingredients, stirring until the batter achieves a smooth, uniform consistency without overmixing.
- Transfer the crimson batter into the prepared pan, spreading evenly. Bake for 25-30 minutes, checking doneness with a toothpick inserted into the center.
- Allow the cake to cool completely on a wire rack, ensuring it reaches room temperature before further preparation.
- Chill a mixing bowl in the freezer for 15 minutes to prepare for cream assembly. Whip heavy cream, powdered sugar, and vanilla extract using an electric mixer until stiff peaks form, taking care not to overwhip.
- Carefully slice the cooled cake horizontally into two or three uniform layers using a serrated knife.
- Position the first cake layer on a serving plate, spreading a generous layer of whipped cream. Repeat with subsequent layers, creating a delicate cream-filled structure.
- Coat the entire cake with remaining cream, ensuring smooth and even coverage on top and sides.
- Decorate with fresh cranberries and mint leaves, creating an elegant holiday presentation.
- Dust the cake’s surface with a light sprinkle of powdered sugar, mimicking a delicate winter snowfall. Optional: Add a touch of gold edible glitter for festive sparkle.
- Refrigerate the cake for 1-2 hours to allow the filling to set and flavors to meld.
- Slice and serve this festive red velvet masterpiece to eager guests.
Notes
- Customize food coloring intensity by adjusting drops for deeper or lighter red velvet color.
- Select high-quality cocoa powder for richer chocolate undertones in the cake.
- Ensure buttermilk is room temperature to help ingredients blend smoothly and create tender crumb.
- Prevent food coloring stains by wearing disposable gloves during preparation.
- Whip cream carefully to avoid turning it into butter; stop when stiff peaks form with soft, glossy texture.
- Use cold mixing bowl and chilled whisk for faster, more stable whipped cream.
- Replace heavy cream with coconut cream for dairy-free alternative.
- Prep Time: 45 minutes
- Cook Time: 30 minutes
- Category: Desserts
- Method: Baking
- Cuisine: American
Nutrition
- Serving Size: 12
- Calories: 210
- Sugar: 16 g
- Sodium: 200 mg
- Fat: 8 g
- Saturated Fat: 1.5 g
- Unsaturated Fat: 6 g
- Trans Fat: 0 g
- Carbohydrates: 30 g
- Fiber: 1 g
- Protein: 3 g
- Cholesterol: 25 mg
Marcus Hale
Founder & Recipe Storyteller
Expertise
Education
Holyoke Community College – HCC-MGM Culinary Arts Institute
Marcus grew up surrounded by maple trees, farm stands, and the smell of Sunday stew simmering on the stove. After earning his Culinary Arts Certificate from the HCC-MGM Culinary Arts Institute, he knew he didn’t want to work in fancy kitchens, he wanted to cook for real people.
At Whip Up Cook Up, Marcus is the guy turning memories into meals. His recipes are fast, full of flavor, and built for home cooks who want big taste without the drama.