
Creamy Dream: Irresistible Rice Krispie Cheesecake Recipe
Creamy cheesecake meets crispy rice krispie magic in a dessert that defies ordinary expectations.
Sweet layers of smooth cream cheese blend perfectly with crunchy cereal goodness.
Marshmallows add gooey charm to this irresistible treat.
Dessert enthusiasts will appreciate the delightful contrast between silky filling and crackling base.
Each bite promises a symphony of textures that dance across your palate.
Rich yet light, this recipe strikes a perfect balance between indulgence and playfulness.
You won’t believe how simple ingredients can create such an extraordinary culinary experience.
Grab your mixing bowl and let the delicious adventure begin!
Cheesecake That Crunches Like Rice Krispies
Rice Krispie Cheesecake What You’ll Need
Rice Krispie Base:Cheesecake Filling:Optional Ingredient:Simple Steps to Make Rice Krispie Cheesecake
Step 1: Craft the Crispy Foundation
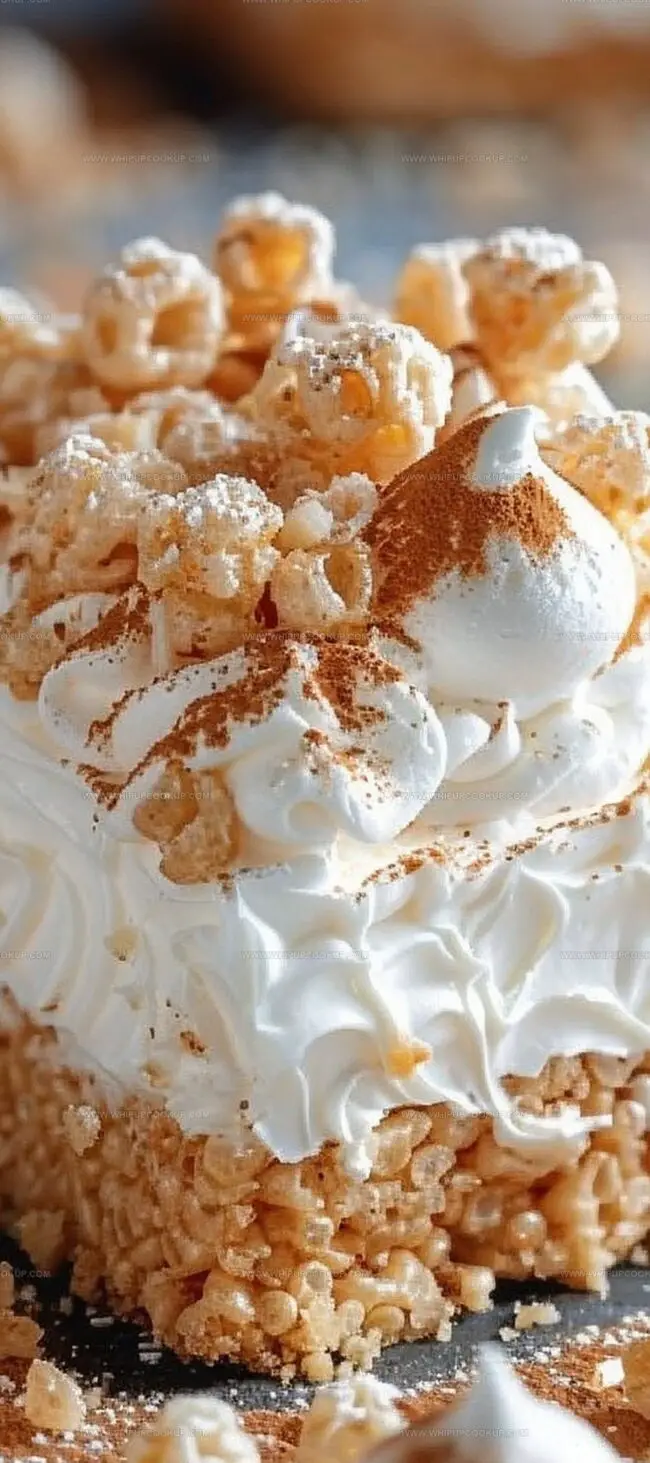
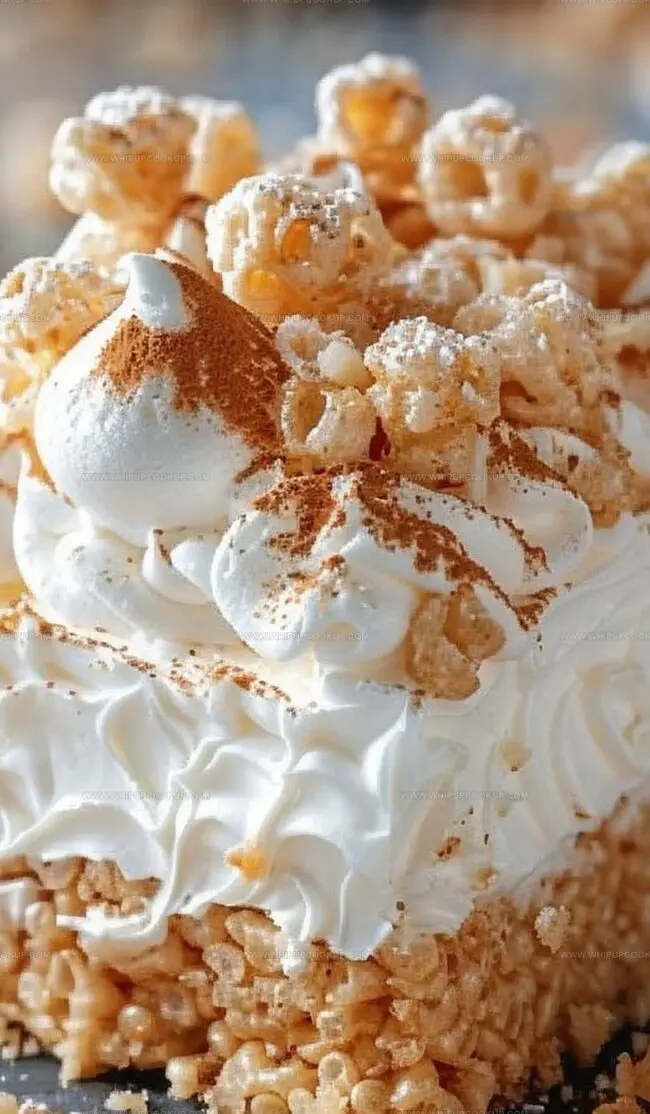
Warm butter in a large pot over medium heat until it melts smoothly. Toss in marshmallows and stir continuously until they transform into a silky, glossy mixture. Remove from heat and quickly fold in Rice Krispies, ensuring every crunchy piece gets coated perfectly. Press the sticky mixture firmly into a greased 9-inch springform pan, creating a solid, compact base. Allow the foundation to cool and set to room temperature.
Step 2: Whip Up the Creamy Filling
In a mixing bowl, blend softened cream cheese, powdered sugar, and vanilla extract until the mixture becomes velvety smooth. In a separate bowl, whip heavy cream until it forms elegant, stiff peaks. Gently incorporate the whipped cream into the cream cheese mixture, folding delicately to maintain the airy texture. Add a splash of lemon juice for a subtle zingy twist if desired.
Step 3: Layer and Chill
Carefully pour the luscious cheesecake filling over the Rice Krispie base, spreading it evenly with a spatula. Cover the pan and place in the refrigerator for a minimum of 4 hours, allowing the dessert to set completely and develop its rich, creamy consistency.
Step 4: Unveil and Savor
After chilling, release the cheesecake from the springform pan. Slice into perfect wedges and serve. Delight in the contrast between the crunchy, sweet base and the smooth, tangy cheesecake filling.
No-Bake Tips for Rice Krispie Cheesecake
How to Keep Rice Krispie Cheesecake Soft
Cheesecake with Rice Krispies Pairings
Pair Sweetly Creamy Treat with Complementary Flavors
Cheesecake Rice Krispie Treat Spins
FAQs
The Rice Krispie base offers a delightful crunch and sweetness that replaces traditional graham cracker crusts, adding a playful texture to the classic cheesecake.
You can use a regular cake pan, but a springform pan makes removing the cheesecake much easier without damaging the dessert’s structure.
The cheesecake is ready when it’s firm to the touch and doesn’t jiggle significantly when gently shaken, typically after 4-6 hours of chilling in the refrigerator.
The lemon juice is optional but adds a subtle tangy brightness that balances the sweetness of the cream cheese and marshmallow base, enhancing the overall flavor profile.
Print
Rice Krispie Cheesecake Recipe
- Total Time: 4 hours 30 minutes
- Yield: 8 1x
Description
Creamy New York cheesecake meets classic rice krispie treats in this delightful dessert mashup. Crispy marshmallow crust and silky smooth filling create a nostalgic yet sophisticated sweet that will make dessert lovers swoon with delight.
Ingredients
Main Ingredients:
- 1 package (10 ounces / 283 grams) marshmallows
- 1/4 cup (57 grams) butter
- 3 cups Rice Krispies cereal
Instructions
- Transform Rice Krispies into a delectable base by melting butter in a large pot over moderate heat. Introduce marshmallows and stir until they dissolve completely into a silky consistency. Immediately remove from heat and incorporate Rice Krispies, ensuring each piece receives a uniform marshmallow coating.
- Carefully transfer the sticky mixture into a greased 9-inch springform pan, using firm pressure to create a compact, even foundation. Allow the base to stabilize and cool to room temperature.
- Prepare the luxurious cheesecake filling by whipping cream cheese until exceptionally smooth. Gradually integrate powdered sugar and vanilla extract, blending until the mixture achieves a velvety texture.
- In a separate vessel, whip heavy cream until it forms pronounced, sturdy peaks. Gently fold the whipped cream into the cream cheese mixture, maintaining its airy structure. Optional: incorporate a hint of lemon juice for a subtle brightness.
- Carefully pour the creamy filling over the Rice Krispie base, using a spatula to distribute evenly and eliminate any potential air pockets.
- Refrigerate the assembled dessert for a minimum of 4 hours, allowing the cheesecake to set completely and develop its signature rich consistency.
- When ready to serve, release the springform pan’s latch and transfer the cheesecake to a serving platter. Slice into elegant portions, revealing the contrasting layers of crunchy base and smooth filling.
Notes
- Ensure marshmallows melt completely without burning by stirring constantly and using low-medium heat for a smooth, even base.
- Use room temperature cream cheese to prevent lumps and achieve a silky, creamy filling that blends seamlessly.
- Whip heavy cream until stiff peaks form but avoid overbeating, which can make the texture grainy and affect the cheesecake’s smooth consistency.
- Make this dessert gluten-free by using gluten-free Rice Krispies or replacing them with crushed gluten-free cookies for those with dietary restrictions.
- Prep Time: 30 minutes
- Cook Time: 4 hours
- Category: Desserts
- Method: None
- Cuisine: American
Nutrition
- Serving Size: 8
- Calories: 220
- Sugar: 10 g
- Sodium: 90 mg
- Fat: 9 g
- Saturated Fat: 5 g
- Unsaturated Fat: 3 g
- Trans Fat: 0 g
- Carbohydrates: 32 g
- Fiber: 0 g
- Protein: 1 g
- Cholesterol: 15 mg
Marcus Hale
Founder & Recipe Storyteller
Expertise
Education
Holyoke Community College – HCC-MGM Culinary Arts Institute
Marcus grew up surrounded by maple trees, farm stands, and the smell of Sunday stew simmering on the stove. After earning his Culinary Arts Certificate from the HCC-MGM Culinary Arts Institute, he knew he didn’t want to work in fancy kitchens, he wanted to cook for real people.
At Whip Up Cook Up, Marcus is the guy turning memories into meals. His recipes are fast, full of flavor, and built for home cooks who want big taste without the drama.