
Spooky & Sweet Rice Krispie Treat Mummies Recipe
Creepy and cute rice krispie treat mummies will spark joy at your next Halloween gathering.
Bandaged marshmallow squares peek out with googly candy eyes, creating whimsical monster characters.
Soft and chewy textures combine with playful decorations that kids adore.
Sweet treats become spooky characters through simple decorating techniques.
Minimal kitchen skills work perfectly for crafting these adorable desserts.
Marshmallow and white chocolate drizzles create delightful mummy-like wrappings across each square.
You can transform ordinary snacks into festive masterpieces that will delight everyone at the party.
Halloween Treats That Use Just Three Ingredients
Rice Krispie Mummies: What You’ll Need
Main Ingredients:Decorative Ingredients:Preparation Ingredients:Rice Krispie Treat Mummies How to Assemble This Fun Snack
Step 1: Prepare Workspace
Clear a clean, flat surface for creating your spooky treats. Line a baking sheet with parchment paper for easy cleanup and smooth chocolate coating.
Step 2: Melt Chocolate Coating
Gently melt white chocolate in the microwave using short 20-second bursts. Stir between each interval until smooth and completely liquid. Avoid overheating to prevent burning.
Step 3: Chocolate Dipping
Carefully submerge each Rice Krispie treat into the melted white chocolate, ensuring full coverage on the front and sides. Place treats chocolate-side down on the prepared baking sheet. Allow excess chocolate to drip off naturally.
Step 4: Create Mummy Wrapping
Transfer remaining melted chocolate into a small zip-lock bag. Carefully snip a tiny corner to create a thin piping opening. Drizzle chocolate horizontally across the treats in irregular, bandage-like patterns to mimic mummy wrappings.
Step 5: Add Spooky Eyes
Dot two small black eyes onto each treat using decorating gel. For an extra creepy effect, add a tiny drop of red food coloring near the eyes to create a haunting gaze.
Step 6: Chill and Set
Place treats in the refrigerator for 3-5 minutes to help chocolate harden quickly. The cool temperature will help create a crisp, clean mummy appearance.
Step 7: Serve and Enjoy
Transfer treats to a festive Halloween serving platter. These mummy Rice Krispie treats are ready to delight guests at parties or as a fun seasonal snack. Store in an airtight container to maintain freshness.
Halloween Snack Mix Tips for 5-Minute Prep
Rice Krispie Mummies Store After the Halloween Bash
Rice Krispie Mummies Snack Matches
Halloween Decorating Tips for Rice Krispie Treat Mummies
FAQs
Use a microwave-safe bowl and heat on half power. Stir every 20 seconds to prevent burning and ensure smooth melting.
White chocolate works best for the mummy effect, but milk or dark chocolate can create a different Halloween look if you prefer.
Use black icing or melted dark chocolate to create simple mummy eyes. You can also use small candies or decorative edible eyes from baking stores.
Absolutely not! This recipe is super easy and perfect for beginners. Anyone can create these spooky Halloween treats with just three ingredients and basic kitchen tools.
Print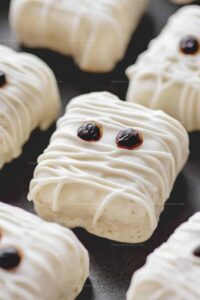
Rice Krispie Treat Mummies Recipe
- Total Time: 20 minutes
- Yield: 6 1x
Description
Spooky Halloween Rice Krispie Treat Mummies bring playful terror to dessert tables with adorable marshmallow-wrapped chocolate creatures. Bandaged white chocolate drizzles and cute candy eyes make these treats perfect for festive seasonal gatherings.
Ingredients
Halloween Mummy Rice Krispie Treats
Main Ingredients:
- 6 snack-size Rice Krispie treats
- 3 cups (525 grams) white chocolate chips
Decorative Ingredients:
- 1 black edible piping gel or icing
- Optional: Red food coloring
Instructions
- Prepare a clean workspace and line a baking sheet with foil for easy cleanup and chocolate drizzling.
- Warm white chocolate in a microwave-safe bowl, reducing power to prevent burning. Stir frequently during 20-second intervals until completely smooth and glossy.
- Carefully submerge each Rice Krispie treat into the melted white chocolate, ensuring comprehensive coverage on front and sides. Gently place treated treats onto prepared foil-lined surface.
- Rapidly chill the chocolate-coated treats in refrigerator or freezer for a quick 2-3 minute hardening period.
- Transfer remaining white chocolate into a small zip-lock bag, strategically trimming a tiny corner to create a precise piping tool. Artfully drizzle chocolate across treats in random, crisscrossing patterns mimicking mummy bandages.
- Allow chocolate drizzles to partially set, then delicately place two precise black gel dots representing spooky mummy eyes. Optional: Introduce subtle red food coloring for an eerie Halloween effect.
- Arrange decorated mummy treats on a festive serving platter or store within an airtight container, maintaining freshness for up to seven days.
Notes
- Melt white chocolate slowly and gently to prevent burning, using low microwave power and stirring frequently for smooth consistency.
- Use a piping bag or zip-lock bag with a small corner snipped for precise, neat mummy bandage drizzles across the treats.
- Customize Halloween design by experimenting with different eye colors or adding edible googly eyes for extra playful character.
- Adapt recipe for dietary needs by using dairy-free white chocolate or gluten-free Rice Krispies for inclusive Halloween snacking.
- Prep Time: 15 minutes
- Cook Time: 5 minutes
- Category: Snacks, Desserts
- Method: Melting
- Cuisine: American
Nutrition
- Serving Size: 6
- Calories: 200
- Sugar: 20g
- Sodium: 50mg
- Fat: 9g
- Saturated Fat: 5g
- Unsaturated Fat: 4g
- Trans Fat: 0g
- Carbohydrates: 30g
- Fiber: 0g
- Protein: 1g
- Cholesterol: 5mg
Marcus Hale
Founder & Recipe Storyteller
Expertise
Education
Holyoke Community College – HCC-MGM Culinary Arts Institute
Marcus grew up surrounded by maple trees, farm stands, and the smell of Sunday stew simmering on the stove. After earning his Culinary Arts Certificate from the HCC-MGM Culinary Arts Institute, he knew he didn’t want to work in fancy kitchens, he wanted to cook for real people.
At Whip Up Cook Up, Marcus is the guy turning memories into meals. His recipes are fast, full of flavor, and built for home cooks who want big taste without the drama.