
The Rustic No-Knead Rosemary Garlic Bread Recipe You’ll Adore
My kitchen often fills with warmth when rustic no-knead rosemary garlic bread emerges from the oven, promising comfort in every slice.
Fragrant herbs swirl through soft, pillowy dough that practically begs to be torn apart.
Ancient baking techniques dance with simple ingredients to create something magical.
Minimal effort yields maximum flavor in this delightful recipe.
Crusty exterior and tender crumb promise a sensory experience that will transport you straight to an Italian countryside.
Fresh rosemary and robust garlic weave complexity into each bite.
Why Rosemary Bread Is a Comfort Food Staple
Feta Bruschetta Wreath Ingredient Breakdown
Dry Ingredients:Herbs and Aromatics:Wet Ingredients:Additional Items:Feta Bruschetta Wreath: Making It Easy
Step 1: Create Magical Dough Fusion
In a spacious mixing bowl, blend the dry ingredients:Sprinkle in freshly chopped rosemary and minced garlic. Pour warm water and extra virgin olive oil into the mixture. Stir everything until a delightfully sticky dough emerges. Cover the bowl with plastic wrap and let the dough rest at room temperature for 12-18 hours, allowing flavor development and natural fermentation.
Step 2: Gently Shape Artisan Loaf
Once the dough has transformed into a bubbly, soft masterpiece, softly transfer it onto a flour-dusted surface. With gentle hands, shape the dough into a rustic round loaf. Be delicate to preserve the beautiful air pockets that give the bread its incredible texture.
Step 3: Prepare for Final Rise
Position the shaped dough onto parchment paper. Let it rise for 30-40 minutes. Meanwhile, place a Dutch oven inside the oven and preheat to 450°F. The hot environment will help create that perfect crispy exterior.
Step 4: Bake to Golden Perfection
Carefully slide the parchment-covered dough into the scorching hot Dutch oven. Cover and bake for 30 minutes. Remove the lid and continue baking for an additional 10-15 minutes until the crust turns a gorgeous golden brown and develops an irresistible crispness.
Step 5: Cool and Savor
Remove the bread from the oven and let it cool for 10-15 minutes. This resting period allows the interior to set. Slice and serve warm with a generous spread of butter or a drizzle of olive oil for an extraordinary homemade bread experience.
Appetizer Tips for a Flavorful Feta Bruschetta Wreath
Master No-Knead Dough Technique: Handle the dough gently to preserve those beautiful air pockets that create a light, airy interior with a crispy crust.
Herb Freshness Matters: Use fresh rosemary for the most vibrant flavor – dried herbs work, but fresh will give your bread a more intense, aromatic punch.
Perfect Resting Time: Let the dough ferment between 12-18 hours at room temperature to develop deep, complex flavors and improve bread texture.
Dutch Oven Magic: Preheat your Dutch oven to create steam, which helps develop a crispy, golden-brown exterior that’s beautifully crusty and professional-looking.
Temperature Control: Allow bread to cool completely before slicing to prevent gummy texture and help the interior set properly for clean, even cuts.
Feta Bruschetta Wreath Leftovers and How to Reuse Them
Appetizer Matches for Feta Bruschetta Wreath
Rosemary Garlic Bread Style Swaps
FAQs
A Dutch oven creates steam and provides even high heat, which helps develop a crispy golden crust and allows the bread to rise beautifully during the initial baking period.
You can easily substitute rosemary with other herbs like thyme, oregano, or basil while keeping the same quantity. Fresh herbs work best for maximum flavor.
Bread flour is ideal because it has higher protein content, which helps create better structure and chewiness. All-purpose flour can also work well if bread flour isn’t available.
Absolutely! No-knead bread is extremely forgiving and requires minimal hands-on time. The long slow rise develops complex flavors and requires very little technical baking skill.
Print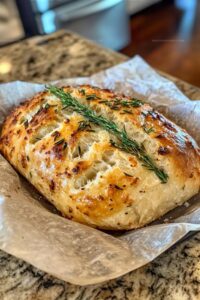
Rustic No-Knead Rosemary Garlic Bread Recipe
- Total Time: 15 hours 45 minutes
- Yield: 8 1x
Description
Rustic no-knead rosemary garlic bread delivers a soul-warming Mediterranean embrace with minimal effort. Crusty exterior and pillowy interior invite bread enthusiasts to savor each aromatic slice that whispers comfort and simplicity.
Ingredients
Main Ingredients:
- 3 cups all-purpose flour
- 1.5 teaspoons (7.5 grams) salt
- 0.25 teaspoons (1.25 grams) active dry yeast
- 1.5 cups (360 milliliters) water
Flavor Enhancers:
- 2 tablespoons fresh rosemary, chopped
- 3 cloves garlic, minced
Optional Garnish:
- 1 tablespoon olive oil (for brushing)
Instructions
- Create a loose dough mixture by whisking flour, salt, and yeast together in a spacious vessel. Incorporate finely chopped rosemary and minced garlic, ensuring even distribution throughout the dry ingredients.
- Pour warm water and olive oil into the flour mixture, stirring with a wooden spoon until a shaggy, sticky texture emerges. Ensure no dry flour pockets remain in the developing dough.
- Cover the bowl completely with plastic wrap and let the mixture ferment at ambient temperature for 12-18 hours. During this extended resting period, wild yeast will develop complex flavors and create numerous air bubbles.
- When fermentation completes, sprinkle flour across a clean work surface. Gently turn out the bubbly dough, handling it delicately to preserve the intricate air pockets that provide the bread’s signature texture.
- Softly shape the dough into a rustic round loaf, using minimal manipulation to maintain its airy structure. Transfer the formed loaf onto a parchment paper surface.
- Allow the shaped dough to undergo a secondary proofing for 30-40 minutes, giving it time to relax and slightly expand. Simultaneously, position a Dutch oven inside the oven and preheat to 450°F (230°C).
- Carefully slide the parchment paper with dough into the scorching hot Dutch oven. Cover and bake for 30 minutes, creating steam that helps develop a crisp exterior.
- Remove the lid and continue baking for an additional 10-15 minutes until the crust transforms into a gorgeous golden-brown color with a crackling surface.
- Remove the bread from the oven and transfer to a cooling rack. Let it rest for 10-15 minutes, allowing internal moisture to redistribute and structure to set before slicing.
Notes
- Elevate the bread’s flavor by toasting fresh rosemary and minced garlic before adding them to the dough for a deeper, more complex taste profile.
- Experiment with different flour types like whole wheat or spelt for varied textures and nutritional benefits, ensuring the hydration levels remain consistent.
- For gluten-sensitive individuals, substitute regular flour with a high-quality gluten-free blend, adding xanthan gum to help maintain the bread’s structure and rise.
- Create a crispy, professional-looking crust by scoring the top of the dough with a sharp knife before baking, allowing for beautiful expansion and artistic design.
- Prep Time: 15 hours
- Cook Time: 45 minutes
- Category: Lunch, Dinner, Appetizer, Snacks
- Method: Baking
- Cuisine: Italian
Nutrition
- Serving Size: 8
- Calories: 150
- Sugar: 0.5 g
- Sodium: 200 mg
- Fat: 2 g
- Saturated Fat: 0.5 g
- Unsaturated Fat: 1.5 g
- Trans Fat: 0 g
- Carbohydrates: 30 g
- Fiber: 1 g
- Protein: 4 g
- Cholesterol: 0 mg
Marcus Hale
Founder & Recipe Storyteller
Expertise
Education
Holyoke Community College – HCC-MGM Culinary Arts Institute
Marcus grew up surrounded by maple trees, farm stands, and the smell of Sunday stew simmering on the stove. After earning his Culinary Arts Certificate from the HCC-MGM Culinary Arts Institute, he knew he didn’t want to work in fancy kitchens, he wanted to cook for real people.
At Whip Up Cook Up, Marcus is the guy turning memories into meals. His recipes are fast, full of flavor, and built for home cooks who want big taste without the drama.