
Fluffy Sourdough Discard Flatbread Recipe: Golden Homemade Joy
Crafting delicious sourdough discard flatbread can turn leftover starter into a culinary adventure.
Flour-dusted counters become your playground for experimenting with simple ingredients.
Crispy edges and soft centers make this recipe a perfect canvas for creativity.
Minimal prep work means you can whip up these flatbreads without complicated techniques.
Versatile and forgiving, these flatbreads welcome endless topping combinations from herbs to cheese.
Pantry staples transform into a delightful meal that celebrates resourceful cooking.
Your kitchen will soon fill with the irresistible aroma of freshly baked flatbread.
What Makes 3-Ingredient Sourdough Discard Flatbread So Smart
Sourdough Discard Flatbread (3-Ingredient) Ingredients
Flatbread Base:Flavor Enhancers:Sourdough Discard Flatbread with 3 Ingredients
Step 1: Prepare Dough Mixture
Grab a mixing bowl and combine the sourdough discard, yogurt, and flour. Toss in a pinch of salt, some minced garlic, and your favorite herbs if you’re feeling fancy. Stir everything together until you’ve got a soft, pliable dough. If the mixture seems too sticky, sprinkle in a bit more flour to help it come together.
Step 2: Knead and Relax the Dough
Dust your work surface with flour and gently knead the dough for a minute or two. You’re looking for a smooth, elastic texture that feels satisfying to the touch. Let the dough take a quick breather and rest for 5-10 minutes. This gives the gluten a chance to relax and makes rolling out easier.
Step 3: Shape the Flatbreads
Divide your rested dough into 4-6 equal pieces. Using a rolling pin, transform each piece into a thin round or oval shape. Aim for about ⅛-inch thickness – thin enough to be crispy but not so thin it falls apart.
Step 4: Cook to Golden Perfection
Fire up a dry skillet over medium-high heat. Carefully place each flatbread into the hot pan. Watch the magic happen as bubbles start to form and the bottom turns a beautiful golden brown. Flip after 1-2 minutes and cook the other side until it matches. The result? Crispy, tangy flatbreads that’ll make your taste buds dance!
Flatbread Tips That Put 3 Ingredients to Delicious Use
Storing 3-Ingredient Sourdough Flatbread for Later
Sides That Match Sourdough Flatbread
Sourdough Flatbread Options
FAQs
Sourdough discard is the extra fermented starter removed during regular sourdough maintenance. It adds tangy flavor and helps reduce food waste by using leftover starter in a delicious way.
No, you can use all-purpose flour or whole wheat flour. The recipe is very forgiving and works well with different flour types, making it versatile and easy to adapt.
Yogurt helps create a soft, tender texture, but you can substitute with sour cream or even milk if needed. Each alternative will slightly change the final bread’s consistency.
Look for golden brown spots and small bubbles forming on the surface. The bread should be slightly puffy and have a light, crispy texture when done cooking.
Print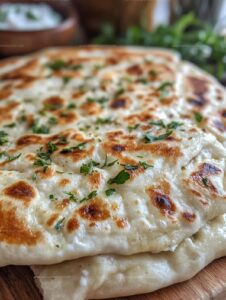
Sourdough Discard Flatbread Recipe
- Total Time: 25 minutes
- Yield: 4 1x
Description
Sourdough discard flatbread brings Mediterranean charm to your kitchen, blending tangy complexity with rustic simplicity. Crisp edges and pillowy centers invite warm sharing, connecting home cooks with ancient culinary traditions you’ll savor with each delightful bite.
Ingredients
Main Ingredients:
- 1 cup all-purpose flour
- 1/2 cup sourdough discard (unfed)
- 1/2 cup plain Greek yogurt (or regular yogurt)
Dusting:
- All-purpose flour (as needed for dusting)
Instructions
- Gather sourdough discard, yogurt, and flour in a mixing vessel, incorporating salt, garlic, and herbs for enhanced flavor profile. Blend ingredients thoroughly until a cohesive, pliable dough emerges, adjusting flour quantity if the mixture appears overly moist.
- Transfer dough to a lightly floured surface and gently manipulate with fingertips, working the mixture for approximately 90 seconds until achieving a smooth, uniform consistency. Allow the dough to relax and settle for a brief 5-10 minute interval.
- Partition the rested dough into 4-6 equivalent portions. Using a rolling implement, transform each segment into a delicate, translucent round or elongated shape, aiming for a gossamer-thin thickness approximating ⅛ inch.
- Activate a dry skillet over moderate to high thermal intensity. Carefully position each flatbread into the heated surface, monitoring closely as golden-brown hues develop and characteristic bubbles effortlessly rise across the delicate canvas. Flip and repeat cooking process, ensuring balanced, crisp exterior on both sides.
Notes
- Flour flexibility matters when creating the perfect texture; swap all-purpose with whole wheat or gluten-free blends for diverse dietary needs.
- Temperature control is crucial for achieving golden-brown surfaces without burning; medium-high heat ensures crispy exterior and soft interior.
- Rest time allows gluten to relax, making dough easier to roll and preventing tough flatbreads.
- Experiment with additional herbs like rosemary, thyme, or za’atar to elevate flavor profiles and create unique variations.
- Prep Time: 15 minutes
- Cook Time: 10 minutes
- Category: Lunch, Snacks
- Method: Frying
- Cuisine: American
Nutrition
- Serving Size: 4
- Calories: 150
- Sugar: 1 g
- Sodium: 50 mg
- Fat: 3 g
- Saturated Fat: 1 g
- Unsaturated Fat: 2 g
- Trans Fat: 0 g
- Carbohydrates: 27 g
- Fiber: 1 g
- Protein: 5 g
- Cholesterol: 5 mg
Marcus Hale
Founder & Recipe Storyteller
Expertise
Education
Holyoke Community College – HCC-MGM Culinary Arts Institute
Marcus grew up surrounded by maple trees, farm stands, and the smell of Sunday stew simmering on the stove. After earning his Culinary Arts Certificate from the HCC-MGM Culinary Arts Institute, he knew he didn’t want to work in fancy kitchens, he wanted to cook for real people.
At Whip Up Cook Up, Marcus is the guy turning memories into meals. His recipes are fast, full of flavor, and built for home cooks who want big taste without the drama.