
Magical Winter Wonderland Sugar Cookies Recipe for Sweet Joy
Sweet winter wonderland sugar cookies bring magic to your holiday baking adventures.
Delicate snowflake patterns sparkle across these festive treats like whispers of frost.
Cold evenings transform kitchens into cozy havens of sugary delight.
Crisp edges and soft centers promise a melt-in-your-mouth experience that captures seasonal charm.
Cheerful decorations turn simple ingredients into edible art that celebrates winter’s wonder.
One bite transports you to a whimsical landscape of pure sugary joy.
Gather your sprinkles and embrace the delicious memories waiting to be created.
Sugar Cookies That Turn Winter Into a Wonderland
Winter Wonderland Sugar Cookies Ingredients
Main Ingredients:Flour Mix:Liquid Binders:Decorative Elements:Coloring Agents:Making Winter Wonderland Sugar Cookies from Scratch
Step 1: Whip Up the Dough
Mix softened butter and sugar in a large bowl until creamy and airy. Add egg, vanilla, and almond extract, blending thoroughly. Gradually incorporate flour, baking powder, and salt until a smooth, soft dough develops.
Step 2: Chill and Prepare
Wrap dough in plastic wrap and refrigerate for minimum one hour. When ready, dust work surface with flour. Roll out dough to quarter-inch thickness and cut into oval shapes resembling winter landscape frames.
Step 3: Bake to Golden Perfection
Position cookie shapes on parchment-lined baking sheet. Slide into preheated oven at 350°F. Bake for 8-10 minutes until edges turn delicate golden brown. Transfer cookies to wire rack for complete cooling.
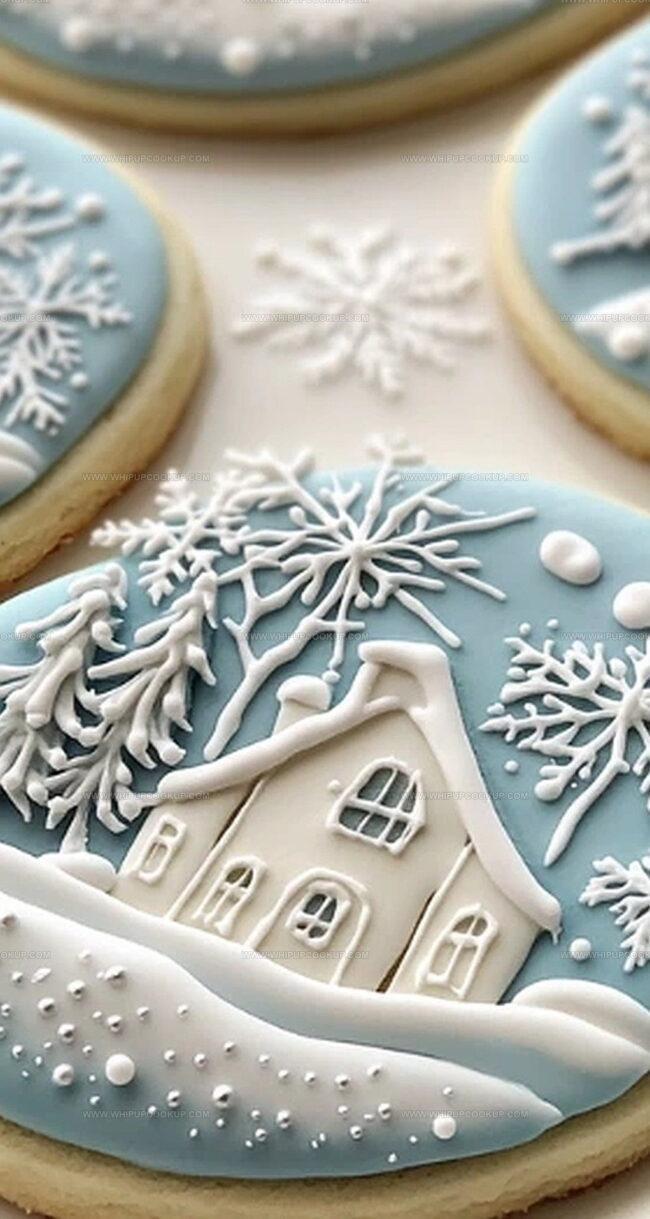
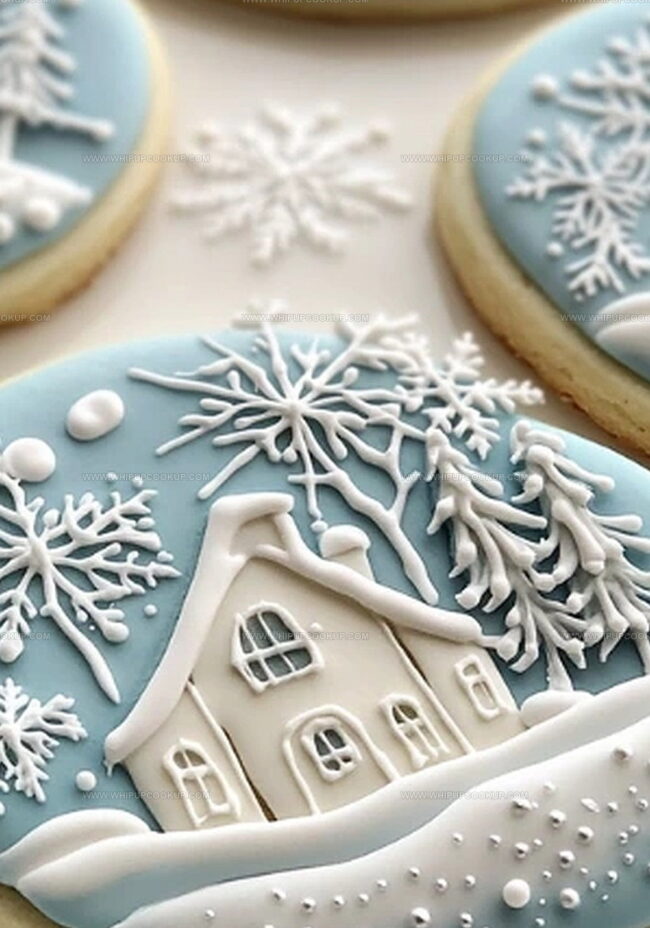
Step 4: Create Magical Winter Scene
Prepare royal icing and divide into two portions:Flood each cookie with pale blue background and allow to dry completely. Using white icing, carefully pipe intricate details:Layer thicker icing for dimensional effect. Let decorations dry fully before handling or serving.
Sugar Cookie Tips for a Winter Wonderland Finish
Store Winter Wonderland Sugar Cookies Easily
Winter Wonderland Cookies Holiday Pairings
Pair Festive Cookies with Complementary Flavors:Wonderland Sugar Cookie Winter Variants
FAQs
The combination of vanilla and optional almond extract creates a rich, aromatic base that enhances the buttery sugar cookie taste, making them more sophisticated and delightful.
Not at all! These cookies are beginner-friendly. The recipe requires basic mixing and rolling techniques, and the decorating process is simple and forgiving, allowing you to create beautiful winter scenes even if you’re not a professional baker.
Roll the dough to exactly 1/4-inch thickness. This ensures even baking and provides the perfect canvas for your royal icing winter landscape design.
Yes! You can prepare the dough up to 3 days in advance and keep it refrigerated. This makes the baking process more convenient and allows the flavors to develop more deeply.
Print
Winter Wonderland Sugar Cookies Recipe
- Total Time: 1 hour 40 minutes
- Yield: 24 1x
Description
Snowflake-inspired winter wonderland sugar cookies invite sweet memories of chilly evenings and festive cheer. Delicate frosted edges and sparkling sugar crystals promise pure holiday magic you’ll savor with each delightful bite.
Ingredients
Primary Ingredients:
- 3 cups all-purpose flour
- 1 cup unsalted butter, softened
- 1 cup granulated sugar
- 1 large egg
Flavor Enhancers:
- 1 teaspoon vanilla extract
- 1/2 teaspoon almond extract (optional)
Leavening and Seasoning:
- 1/2 teaspoon baking powder
- 1/4 teaspoon salt
Instructions
- In a spacious mixing vessel, whip butter and sugar until they transform into a cloud-like, aerated mixture. Incorporate egg, vanilla, and optional almond extract, blending thoroughly until harmoniously combined.
- Gradually fold in flour, baking powder, and salt, kneading gently until a smooth, cohesive dough emerges without stickiness.
- Encase the dough in plastic wrap and refrigerate for a minimum of 60 minutes to firm up the texture.
- Preheat the oven to 350°F (175°C) and prepare a work surface by dusting with flour.
- Roll out the chilled dough to a uniform 1/4-inch thickness, using gentle, even pressure to maintain consistency.
- Utilize oval-shaped cookie cutters to create delicate frames, transferring each carefully onto a parchment-lined baking sheet.
- Slide the baking sheet into the preheated oven and bake for 8-10 minutes, watching for edges to turn a soft golden hue.
- Remove cookies and allow them to cool completely on a wire rack, ensuring they reach room temperature.
- Prepare royal icing, reserving a portion in its pristine white state and tinting the remainder with a whisper of light blue.
- Flood each cookie with the blue icing, creating a serene background, and permit the layer to dry thoroughly.
- Using white icing, meticulously craft winter landscape elements: delicate trees, miniature cottages, and intricate snowflakes.
- Apply additional layers of thicker white icing to generate depth and dimension in the winter scene.
- Allow the decorated cookies to dry completely before handling or packaging, ensuring the intricate details remain pristine.
Notes
- Use room temperature butter for smoother, fluffier cookie dough that blends easily without overmixing.
- Chill dough thoroughly to prevent spreading and maintain intricate cookie shapes during baking.
- Dust rolling pin and surface lightly with flour to prevent sticking without making dough dry or tough.
- Test cookie doneness by checking edges for subtle golden color, avoiding overbaking which creates hard texture.
- Prep Time: 1 hour 30 minutes
- Cook Time: 10 minutes
- Category: Desserts, Snacks
- Method: Baking
- Cuisine: American
Nutrition
- Serving Size: 24
- Calories: 156
- Sugar: 6 g
- Sodium: 28 mg
- Fat: 8 g
- Saturated Fat: 5 g
- Unsaturated Fat: 2 g
- Trans Fat: 0 g
- Carbohydrates: 21 g
- Fiber: 0.5 g
- Protein: 1.7 g
- Cholesterol: 20 mg
Marcus Hale
Founder & Recipe Storyteller
Expertise
Education
Holyoke Community College – HCC-MGM Culinary Arts Institute
Marcus grew up surrounded by maple trees, farm stands, and the smell of Sunday stew simmering on the stove. After earning his Culinary Arts Certificate from the HCC-MGM Culinary Arts Institute, he knew he didn’t want to work in fancy kitchens, he wanted to cook for real people.
At Whip Up Cook Up, Marcus is the guy turning memories into meals. His recipes are fast, full of flavor, and built for home cooks who want big taste without the drama.